1. Tạo project sử dụng Google Maps API

2. Đăng ký và lấy key Google Maps API
Để sử đụng dược Google Maps API trong ứng dụng của mình thì bạn phải đăng ký 1 key miễn phí từ Google Maps API. Để đăng ký được bạn cần làm theo các bước sau :
a. Lấy MD5 fingerprint code
Bạn phải xác định được file debug.keystore , đường dẫn thông thường là:
Windows Vista & Window7: C:\Users\<user>\.android\debug.keystore
Windows XP: C:\Documents and Settings\<user>\.android\debug.keystore
OS X and Linux: ~/.android/debug.keystore
Nếu bạn dùng Eclipse thì có thể vào Windows > Prefs > Android > Build để lấy đường dẫn như bên dưới:

Sau khi lấy được đường dẫn của debug.keystore. Bạn bật cmd lên và chạy command sau để lấy MD5 fingerprint code:
Mã:
keytool -list -alias androiddebugkey -keystore <path_to_debug_keystore>.keystore -storepass android -keypass android
Cụ thể như ở trên mình sẽ chạy command như sau:
Mã:
keytool -list -alias androiddebugkey -keystore C:\Users\Thongdm\.android\debug.keystore -storepass android -keypass android
Kết quả:
Như trên thì MD5 fingerprint code là :
Mã:
46:2C:DD:3F:5A:4E:97:6E:6E:7F:DD:A3:AD:90:FB:73
b. Lấy key Google Maps API
Bạn vào link sau : http://code.google.com/android/maps-api-signup.html
Paste MD5 fingerprint code vào và click Generate API key , site sẽ tự sinh cho bạn 1 key.

Bạn cần lưu lại đoạn code xml ở cuối để paste vào layout mỗi khi cần sử dụng Google Maps API.
3. Hiển thị Google Maps trên ứng dụng của bạn
Để sử dụng Google Maps API , bạn phải khai báo trong file AndroidManifest.xml
Bằng cách add thêm <uses-library> cùng với INTERNET Permission.
|
1
|
<uses-library android:name="com.google.android.maps" />
|
và
|
1
|
<uses-permission android:name="android.permission.INTERNET" />
|
Full source :
|
1
2
3
4
5
6
7
8
9
10
11
12
13
14
15
16
17
18
19
20
21
22
|
<?xml version="1.0" encoding="utf-8"?>
package="com.vietandroid.tut.map"
android:versionCode="1"
android:versionName="1.0">
<application android:icon="@drawable/icon" android:label="@string/app_name">
<uses-library android:name="com.google.android.maps" />
<activity android:name=".GoogleMapsActivity"
android:label="@string/app_name">
<intent-filter>
<action android:name="android.intent.action.MAIN" />
<category android:name="android.intent.category.LAUNCHER" />
</intent-filter>
</activity>
</application>
<uses-sdk android:minSdkVersion="3" />
<uses-permission android:name="android.permission.INTERNET"></uses-permission>
</manifest>
|
Tiếp theo bạn add đoạn code lấy được ở phần 2 vào Layout
|
1
2
3
4
5
6
7
8
9
10
11
12
13
14
15
16
17
18
19
20
21
22
|
<?xml version="1.0" encoding="utf-8"?>
android:layout_width="fill_parent"
android:layout_height="fill_parent"
>
<TextView
android:layout_width="fill_parent"
android:layout_height="wrap_content"
android:text="@string/hello"
/>
<com.google.android.maps.MapView android:id="@+id/simpleGM_map"
android:layout_width="fill_parent"
android:layout_height="310px"
android:apiKey="0tl5xRhVSFoXlIq3NfZ97l4zLTKLVHtklJ-D5CQ"
android:layout_x="2px"
android:layout_y="100px"
android:clickable="true" />
</LinearLayout>
|
Trong GoogleMapsActivity.java bạn phải Extend MapsActivity và overrides phương thức isRouteDisplayed()
|
1
2
3
4
5
6
7
8
9
10
11
12
13
14
15
16
17
18
19
20
|
package com.vietandroid.tut.map;
import android.os.Bundle;
import com.google.android.maps.MapActivity;
public class GoogleMapsActivity extends MapActivity {
/** Called when the activity is first created. */
@Override
public void onCreate(Bundle savedInstanceState) {
super.onCreate(savedInstanceState);
setContentView(R.layout.main);
}
@Override
protected boolean isRouteDisplayed() {
// TODO Auto-generated method stub
return false;
}
}
|
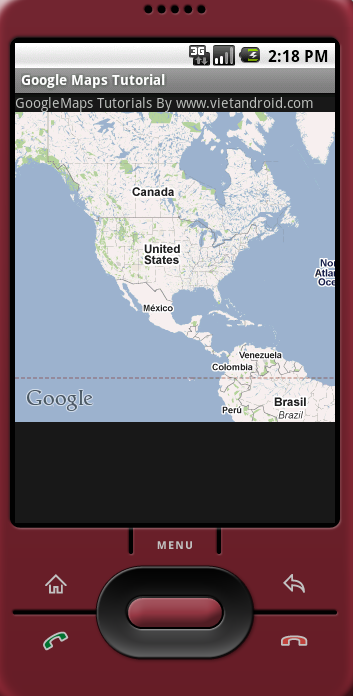
Thế là xong, đến đây bạn chạy chương trình:

Mình hướng dẫn khá cụ thể rồi, chắc không cần post sourcecode lên đây, bạn nào cần thì yêu cầu bên dưới nhé.
Download Sourcecode : Click here


