Guzzle is a PHP-based HTTP client library
In our previous blog post, we took a look at Composer, a PHP-based class autoloader and dependency management tool, and used it to begin managing some dependencies and downloaded Guzzle. Guzzle is a PHP-based HTTP client library that greatly simplifies the process of consuming RESTful web services. In this blog, we’re going to explore some of Guzzle’s basic abilities, and use it to begin building a simple SDK of sorts.
Getting Started
Since we’ve been away from our composer project for a while, let’s start by updating it and getting the newest available code. To review, your composer.json file should look like the following:
{
    "require": {
        "guzzlehttp/guzzle": "4.1.*"
    }
}
We can update to the newest guzzle code by simply running the “composer update” command in the same directory as your composer.json file. If you’re starting from scratch, simply run “composer install” in the same directory instead.
In the previous blog post, I provided some basic code that could be the beginning of your index.php file. Let’s start with that.
<?php // This will initialize composer’s autoloader

$loader = require_once __DIR__ . '/vendor/autoload.php';

// Instantiates a new guzzle client.

$client = new GuzzleHttp\Client(); ?>
This will put a new instance of the guzzle client into $client. From here we can begin to do some really interesting things. As a simple example, let’s just render another website inline.
<?php // This will initialize composer’s autoloader

$loader = require_once __DIR__ . '/vendor/autoload.php';

// Instantiates a new guzzle client.

$client = new GuzzleHttp\Client();

// Get google.com’s main page as a response object.

$response = $client->get('http://www.google.com'); // Print out the body of that page to the screen.

echo $response->getBody(); ?>
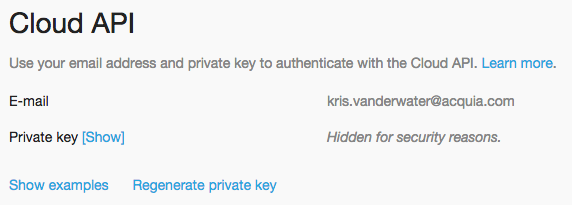
As easily as that, we’ve grabbed google.com’s main front page and printed it within our own local site’s output (yes the images are broken). This is very nifty, but not horribly practical. For a more practical application, let’s see if we can write some requests against Acquia Cloud API. In order to do this, you need to sign up with Acquia Cloud Free or have a pre-existing Acquia Cloud account. Acquia Cloud Free is indeed free and is quick and easy to sign up for. Once you’ve done this, you can find your Cloud API private key here. Simply scroll down the page and click the “[Show]” link next to “Private key” under the Cloud API header.

Once you have this let’s try to formulate a request to Cloud API using Guzzle. We’re going to need to make some changes to our index.php. We’ll need a username and a password, and then we’re going to have to configure our guzzle client with them during instantiation.
<?php // This will initialize composer’s autoloader

$loader = require_once __DIR__ . '/vendor/autoload.php';

// Setup our username and password.

$user = '[email protected]'; $pass = 'xxxxx.xxxxxxxxx.xxxx';

// Instantiates a new guzzle client.

$client = new \GuzzleHttp\Client(['defaults' => ['auth' => [$user, $pass]]]); ?>
Replace my $user and $pass with the appropriate credentials for your Cloud API subscription and we will now have a newly configured Guzzle Client which should be able to access Cloud API with our credentials. Let’s add the following lines to the end of our index.php and make a real request to an endpoint in the api and see what we get.
<?php $response = $client->get('https://cloudapi.acquia.com/v1/sites.json');

echo '<pre>' . var_export($response->json(), TRUE) . '</pre>'; ?>
My response for this looks a little something like:
array ( 0 => 'devcloud:example1', 1 => 'devcloud:example2', )
There are numerous other api endpoints for Cloud API and you can view them all here. Let’s manually implement one more of these end points. If we wanted to see what tasks were related to any of your sites, we could simply add the following code to our index.php using one of the sites we retrieved with the previous request. I chose to use my devcloud:example1, you should replace this with one of your sites.
<?php $response = $client->get('https://cloudapi.acquia.com/v1/sites/devcloud:example1/tasks.json');

echo '<pre>' . var_export($response->json(), TRUE) . '</pre>'; ?>
Since we’re using the same $client instance each time, we can just keep making additional requests against Cloud API, but there are other more verbose things we’re doing here each time in order to get this information, and the code is still kind of impractical. Let’s make better use of some of Guzzle’s features and generally clean up the code.
URITemplating
Guzzle has a great feature called URITemplating. It allows us to substitute various parameters into a url to be fulfilled later, and can shorten all of our \GuzzleHttp\Client::get() calls dramatically. In our case, we know what our base url is: https://cloudapi.acquia.com, and we also know that we’re making calls against v1 of the api, as represented in the urls we’ve been making requests against. During instantiation the Guzzle Client class can be configured to make requests to our base url by default. Let’s change our configuration data a little bit and make it more readable and pre-configured with our base_url:
<?php // This will initialize composer’s autoloader

$loader = require_once __DIR__ . '/vendor/autoload.php';

// Setup our username and password.

$user = '[email protected]'; $pass = 'xxxxx.xxxxxxxxx.xxxx';

// Configure the guzzle client.

$config = [   'base_url' => 'https://cloudapi.acquia.com/',   'defaults' => ['auth' => [$user, $pass]], ];
// Instantiates a new guzzle client. $client = new \GuzzleHttp\Client($config); // Get Sites
$response = $client->get('v1/sites.json'); echo '<pre>' . var_export($response->json(), TRUE) . '</pre>';
// get tasks for a site
$response = $client->get('v1/sites/devcloud:example1/tasks.json');
echo '<pre>' . var_export($response->json(), TRUE) . '</pre>'; ?>
This is a great improvement and makes our existing code quite a bit more readable, but we can do better. I previously mentioned the version portion of our url, and to this end we can actually abstract it up a level as well.
<?php $config = [ 'base_url' => 'https://cloudapi.acquia.com/v1/', 'defaults' => ['auth' => [$user, $pass]], ]; ?>
Now, this will absolutely work, but at some point we expect that the version number is likely to change, so let’s isolate it from the base_url so we can treat it independently. To solve this we can use the actual URITemplate capabilities of Guzzle. We will simply inform the Guzzle Client that there’s a portion of the uri which we want to parameterize, and it looks like this:
<?php $config = [ 'base_url' => ['https://cloudapi.acquia.com/{version}/', [‘version’ => ‘v1’]], 'defaults' => ['auth' => [$user, $pass]], ]; ?>By doing this we can now make a simple call like $client->get(‘sites.json’); and expect it to work. Subsequent calls to the get() method will all be routed through the ‘v1’ url we’ve now setup. This means our code should look a bit like this:
<?php // This will initialize composer’s autoloader

$loader = require_once __DIR__ . '/vendor/autoload.php';

// Setup our username and password. $user = '[email protected]';

$pass = 'xxxxx.xxxxxxxxx.xxxx'; // Configure the guzzle client.

$config = [   'base_url' => ['https://cloudapi.acquia.com/{version}/', [‘version’ => ‘v1’]],

  'defaults' => ['auth' => [$user, $pass]], ]; // Instantiates a new guzzle client.

$client = new \GuzzleHttp\Client($config); // Get Sites $response = $client->get('sites.json');

echo '<pre>' . var_export($response->json(), TRUE) . '</pre>';

// get tasks for a site $response = $client->get('sites/devcloud:example1/tasks.json');

echo '<pre>' . var_export($response->json(), TRUE) . '</pre>'; ?>
We don’t NEED to take this any further, but because we’ve reduced our actual calls to essentially 1-2 lines to access the api, we COULD simplify even further and begin building our own SDK. This isn’t strictly necessary since Acquia already has a publicly available PHP SDK based on an earlier version of Guzzle, but for purposes of this blog post, we’re going to take the next step and see how deep the rabbit hole goes.
Putting It All Together
We’ve covered Composer, and now we’ve done some Guzzle. Let’s put them together and begin to build our own codebase for our project outside of what we’ve pulled in from Composer-able components.
Composer affords us the ability to specify a custom namespace to directory mapping in our autoload instructions. Commonly in PHP, you’ll find code of this sort in a “src” directory. Let’s make a “src” directory in the root of our project, and update our composer.json file to something more like this:
{ "require": { "guzzlehttp/guzzle": "4.1.*"},
"autoload": { "psr-4": { "Components5\": "src/" } } }
This tells Composer’s autoloader that the “src” directory maps to any class in the “Components5” namespace. We can begin to create new classes and directories within our “src” dir now and as long as they have that namespace, Composer should pick them up and make them available to us. That being said, we must perform a “composer update” at the command line before this change will take effect.
Once we’ve updated composer within this project, let’s write a new class. I want to write the beginnings of a simple SDK between Cloud and Guzzle. To that end, let’s create a “CloudSDK” dir in our src dir, and a “Client” class within that. We’ll want this class to inherit from Guzzle’s Client class, so we’re going to need to use a special syntax within our “use” statement in order for PHP to allow us to have two classes of the same name. This is essentially formatted as “use X as Y; and this allows you to rename an external class within the scope of this file to anything else you like. Here it is in practice:
<?php /** * @file * Contains \Component5\CloudSDK\Client. */ namespace Components5\CloudSDK; use GuzzleHttp\Client as GuzzleClient; class Client extends GuzzleClient {} ?>Once we have this class, we can begin to write our SDK’s assumptions directly into it. We know our base path and base url, so let’s encode that as constants within our class.
<?php const BASE_URL = 'https://cloudapi.acquia.com/{version}/'; const BASE_PATH = 'v1'; ?>We also know that we are going to need to bake authentication into this class. \GuzzleHttp\Client’s constructor expects an array of configuration values, but we could probably simplify that drastically for our needs to simply $user and $pass. By doing this, we can then use the constructor to format the proper configuration values for a typical Guzzle Client, and we can pass that configuration to our parent’s constructor method.
<?php   public function __construct($user, $pass) {

$config = [

 'base_url' => [$this::BASE_URL, ['version' => $this::BASE_PATH]],

   'defaults' => [         'auth'    => [$user, $pass],       ],     ];

 parent::__construct($config);   } ?>
This gives us a nice and tidy class that we can pass two parameters into and then make get() calls to Acquia’s Cloud API, but in order to really make this as simple as possible, let’s take it one step further and begin to create custom methods that map directly to Cloud API’s service endpoints.
<?php public function getSites() {

return $this->get('sites.json')->json();

}

public function getSiteTasks($site) {

 return $this->get(['sites/{site}/tasks.json', ['site' => $site]])->json();

} ?>
These are two simple methods that reduce the code in our index.php quite dramatically and serve as the beginnings of a sane SDK for working with CloudAPI. Our index.php can be simplified and reduced to this:
<?php // This will initialize composer’s autoloader

$loader = require_once __DIR__ . '/vendor/autoload.php';

// Setup our username and password.

$user = '[email protected]';

$pass = 'xxxxx.xxxxxxxxx.xxxx'; // Create a new CloudSDK Client

$client = new \Components5\CloudSDK\Client($user, $pass); // Get our sites

echo '<pre>' . var_export($client->getSites(), TRUE) . '</pre>'; // Get the tasks related to our first example site.

echo '<pre>' . var_export($client->getSiteTasks('devcloud:example1'), TRUE) . '</pre>'; ?>
I hope you can see how powerful and robust Guzzle can be and why it’s been so widely adopted. Drupal 8 has adopted Guzzle as well, and if you’d like to begin playing with it more directly, you can install Drupal 8 on a new free tier instance and you’ll have Guzzle available to you immediately. If you’re already signed in to your Acquia account, setting up new instances is a snap.


Bình luận (0)
Add Comment