Khanh Hoang - Kenn
Kenn is a user experience designer and front end developer who enjoys creating beautiful and usable web and mobile experiences.
Bài viết này giúp bạn mới làm quen với Zend Framework có thể biết cách cài đặt và sử dụng công cụ zf để tạo các dự án PHP theo mô hình MVC. Trong bài này tôi sử dụng chương trình WampServer và phiên bản ZendFramework 1.11.11.
- Download và cài đặt WampServer: http://www.wampserver.com/en/ tại thư mục C:\wamp.
- Vào trang http://framework.zend.com/download/current/ tải bản Zend Framework 1.11.11 Minimal. Sau khi tải xong, giải nén ra bạn sẽ có thư mục ZendFramework-1.11.11-minimal.
- Tạo thư mục zendframework trong C:\wamp\bin (hoặc một thư mục bất kì), copy tất cả nội dung trong thư mục ZendFramework-1.11.11-minimal vào thư mục zendframework này.
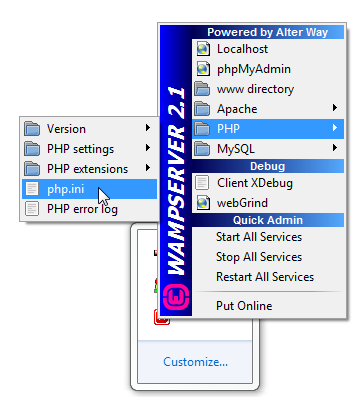
- Mở file php.ini, tìm dòng include_path và sửa thành (kí tự ; dùng để chú thích dòng):

; Windows: "\path1;\path2"
include_path = ".;C:\wamp\bin\zendframework\library"
Tiếp theo bạn cần đăng kí thư mục C:\wamp\bin\zendframework\bin vào biến Path của hệ thống để có thể thực thi công cụ zf.bat tại bất kì đâu.

Vào Command Prompt, gõ “zf” để kiểm tra xem công cụ này có được thực thi hay không.
Note: Trong trường hợp báo lỗi: “php.exe”‘ is not recognized as an internal or external command, operable program or batch file.
Bạn cần đăng kí thêm thư mục C:\wamp\bin\php\php5.3.4 vào biến Path của hệ thống như bên trên.
Ok, nếu như mọi thứ diễn ra suôn sẻ, bạn có thể kiểm tra version của Zend Framework bằng cách gõ lệnh “zf show version” trong Command Prompt:
>zf show version
Zend Framework Version: 1.11.11
Thư mục ánh xạ vào localhost của WampServer là C:\wamp\www, ta sẽ vào thư mục này để tạo một dự án với tên HelloWorld. Trong Command Prompt, chuyển đến thư mục làm việc và gõ lệnh “zf create project HelloWorld”. Kết quả như sau:
C:\wamp\www>zf create project HelloWorld
Creating project at C:/wamp/www/HelloWorld
Note: This command created a web project, for more information setting up your V
HOST, please see docs/README
Testing Note: PHPUnit was not found in your include_path, therefore no testing a
ctions will be created.
Một cấu trúc thư mục sẽ được tạo ra trong thư mục HelloWorld, trong đó thư mục con application sẽ chứa các thư mục quan trọng như controllders, models, views, đây chính là nơi chứa các tập tin tương ứng với mỗi thành phần của mô hình MVC. Ngoài ra thì bạn cần quan tâm tới thư mục public, đây là nơi chứa tập tin index.php sẽ được mặc định nạp lên khi trình duyệt truy xuất đến địa chỉ của server.
C:\WAMP\WWW\HELLOWORLD
├───application
│   ├───configs
│   ├───controllers
│   ├───models
│   └───views
│       ├───helpers
│       └───scripts
│           ├───error
│           └───index
├───docs
├───library
├───public
└───tests
├───application
│   └───controllers
└───library
Bạn cần thay đổi các thiết lập sau trong tập tin httpd.conf (nhấn chuột trái biểu tượng Wamp ở khay hệ thống, Apache>httpd.conf) của Apache:
DocumentRoot "C:/wamp/www/HelloWorld/public"
Mặc định thì Zend Framework đã tạo sẵn cho bạn hai trang con là Index và Error trong các thư mục controllers và views. Tên của tập tin controller của trang Index sẽ là IndexController.php, bên trong tập tin này là một class với các phương thức được định nghĩa. Mỗi phương thức tương ứng với một view hay một tập tin .phtml trong thư mục views.
Bạn có thể truy xuất đến trang Index bằng cách gõ localhost, localhost/index hoặc localhost/index.php.
Bây giờ bạn hãy vào thư mục C:/wamp/www/HelloWorld/application/views/scripts/index để thay đổi giao diện trang Index. File này có tên là index.phtml:
source code

<style>
a:link,
a:visited
{
color: #0398CA;
}
span#zf-name
{
color: #91BE3F;
}
div#welcome
{
color: #FFFFFF;
background-image: url(http://framework.zend.com/images/bkg_header.jpg);
width:  600px;
height: 400px;
border: 2px solid #444444;
overflow: hidden;
text-align: center;
}
div#more-information
{
background-image: url(http://framework.zend.com/images/bkg_body-bottom.gif);
height: 100%;
}
</style>
<div id="welcome">
<h1>Hello World!</h1>
<h2>Welcome to the <span id="zf-name">Zend Framework!</span></h2>
<h3>This is your project's main page</h3>
<div id="more-information">
<p><img src="http://framework.zend.com/images/PoweredBy_ZF_4LightBG.png" /></p>
<p>
Helpful Links: <br />
<a href="http://framework.zend.com/">Zend Framework Website</a> |
<a href="http://framework.zend.com/manual/en/">Zend Framework Manual</a>
</p>
</div>
</div>
Mở trình duyệt và gõ vào địa chỉ localhost, bạn sẽ thấy giao diện trang Index sau khi thay đổi như sau:

Note: Trong trường hợp không thể truy xuất được do thiết lập của tập tin /public/.htaccess, hãy thêm rewrite_module vào cho Apache (Apache>Apache modules>rewrite_module):

Tôi sẽ tạo một trang Customer mới bằng cách dùng lệnh “zf create controller customer”:
C:\wamp\www\HelloWorld\public>zf create controller customer
Note: PHPUnit is required in order to generate controller test stubs.
Note: The canonical controller name that is used with other providers is "Cu
er"; not "customer" as supplied
Creating a controller at C:\wamp\www\HelloWorld/application/controllers/Cust
Controller.php
Creating an index action method in controller Customer
Creating a view script for the index action method at C:\wamp\www\HelloWorld
lication/views/scripts/customer/index.phtml
Khi đó, ngoài tập tin CustomerController.php sẽ được tạo ra trong thư mục controllers, ta sẽ vào thư mục
C:\wamp\www\HelloWorld\application\views\scripts\customer\ để sửa trang index.phtml thành như sau:
source code
<br /><br />
<div id="view-content">
<h1>This is Customer page</h1>
(*_*)
</div>
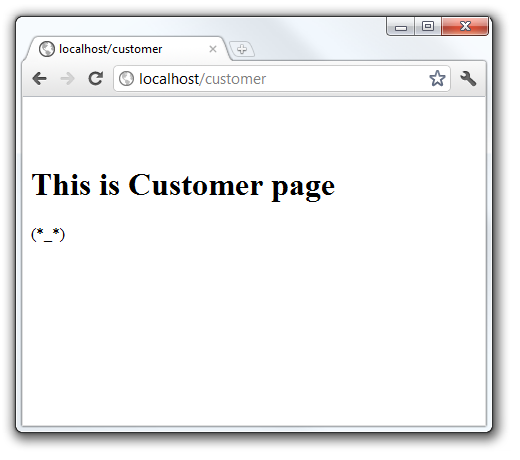
Mở trình duyệt và gõ vào địa chỉ localhost/customer. Trình duyệt sẽ hiển thị giao diện trang mà bạn vừa thay đổi:
