Dịch bệnh Covid-19 đã khiến hàng trăm công ty đóng cửa, trường học cho học sinh nghỉ cả nghìn người mất việc và sắp tới còn nhiều doanh nghiệp phải đình trệ sản xuất. Chia sẻ đến các bạn lập trình App Live Streaming viết bằng Node.js và React
>> Dịch bệnh Covid-19 nên học sinh Hà Nội tiếp tục nghỉ đến 23.2.2020
>> Dịch bệnh Covid-19 nên học sinh Tp.HCM nghỉ học đến ngày 29.2.2020
>> Việc làm online nổi lên trong thời kỳ virus corona hoành hành năm 2020
>> nCoV - cơn ác mộng của ngành công nghiệp du lịch du thuyền
I’ve been working on an app which lets you live stream your desktop. It takes in an RTMP stream from the broadcaster and transcodes it into HLS stream that viewers can watch in their web browsers. In this tutorial, I’ll show how you can build your own video streaming app with Nodejs. If you are ‘I want to directly dive into code’ kind of person, I’ve created this repository for you with setup instructions. I am going to break down this tutorial into five parts.
- Web Server with Basic authentication
- Setting up an RTMP server in Nodejs
- Displaying live streams
- Issuing streaming keys to broadcasters
- Generating live stream thumbnails
Web Server with Basic Authentication
Let’s set up a basic node server with passport local strategy authentication. We will use MongoDB with Mongoose ODM for persistent storage. Initialize a new project by running
$ npm init
and install these dependencies
$ npm install axios bcrypt-nodejs body-parser bootstrap configconnect-ensure-login connect-flash cookie-parser ejs expressexpress-session mongoose passport passport-local requestsession-file-store --save-dev
In your project directory, create two folders client and server. We will place our react components inside the client directory and backend code in the server directory. For this part, we will be working inside the server directory. We are using passport.js for authentication. We have already installed passport and passport-local modules. Before we define our local strategy for authenticating users, let’s create an app.js file and add the necessary code to run a basic web server. Make sure you have MongoDB installed on your system and running as a service.
const express = require('express'),
    Session = require('express-session'),
    bodyParse = require('body-parser'),
    mongoose = require('mongoose'),
    middleware = require('connect-ensure-login'),
    FileStore = require('session-file-store')(Session),
    config = require('./config/default'),
    flash = require('connect-flash'),
    port = 3333,
    app = express();

mongoose.connect('mongodb://127.0.0.1/nodeStream' , { useNewUrlParser: true });

app.set('view engine', 'ejs');
app.set('views', path.join(__dirname, './views'));
app.use(express.static('public'));
app.use(flash());
app.use(require('cookie-parser')());
app.use(bodyParse.urlencoded({extended: true}));
app.use(bodyParse.json({extended: true}));

app.use(Session({
    store: new FileStore({
        path : './server/sessions'
    }),
    secret: config.server.secret,
    maxAge : Date().now + (60 * 1000 * 30)
}));

app.get('*', middleware.ensureLoggedIn(), (req, res) => {
    res.render('index');
});

app.listen(port, () => console.log(`App listening on ${port}!`));
We have bootstrapped all the necessary middlewares for our application, connected to MongoDB and configured express session to use the file storage for session persistence in case of the web server restart. Now we will define our passport strategies for registering and authenticating users. Create a folder named auth with a passport.js file in it and add the following code.
const passport = require('passport'),
    LocalStrategy = require('passport-local').Strategy,
    User = require('../database/Schema').User,
    shortid = require('shortid');

passport.serializeUser( (user, cb) => {
    cb(null, user);
});

passport.deserializeUser( (obj, cb) => {
    cb(null, obj);
});

// Passport strategy for handling user registration
passport.use('localRegister', new LocalStrategy({
        usernameField: 'email',
        passwordField: 'password',
        passReqToCallback: true
    },
    (req, email, password, done) => {
        User.findOne({$or: [{email: email}, {username: req.body.username}]},  (err, user) => {
            if (err)
                return done(err);
            if (user) {
                if (user.email === email) {
                    req.flash('email', 'Email is already taken');
                }
                if (user.username === req.body.username) {
                    req.flash('username', 'Username is already taken');
                }

                return done(null, false);
            } else {
                let user = new User();
                user.email = email;
                user.password = user.generateHash(password);
                user.username = req.body.username;
                user.stream_key = shortid.generate();
                user.save( (err) => {
                    if (err)
                        throw err;
                    return done(null, user);
                });
            }
        });
    }));

// Passport strategy for authenticating users
passport.use('localLogin', new LocalStrategy({
        usernameField: 'email',
        passwordField: 'password',
        passReqToCallback: true
    },
    (req, email, password, done) => {

        User.findOne({'email': email}, (err, user) => {
            if (err)
                return done(err);

            if (!user)
                return done(null, false, req.flash('email', 'Email doesn\'t exist.'));

            if (!user.validPassword(password))
                return done(null, false, req.flash('password', 'Oops! Wrong password.'));

            return done(null, user);
        });
    }));

module.exports = passport;
We also need to define the schema for our User model. Create a database directory with UserSchema.js file in it and add the following code.
let mongoose = require('mongoose'),
    bcrypt   = require('bcrypt-nodejs'),
    shortid = require('shortid'),
    Schema = mongoose.Schema;

let UserSchema = new Schema({
    username: String,
    email : String,
    password: String,
    stream_key : String,
});

UserSchema.methods.generateHash = (password) => {
    return bcrypt.hashSync(password, bcrypt.genSaltSync(8), null);
};

UserSchema.methods.validPassword = function(password){
    return bcrypt.compareSync(password, this.password);
};

UserSchema.methods.generateStreamKey = () => {
    return shortid.generate();
};

module.exports = UserSchema;
We have three methods on our User schema. generateHash method will convert plain text password to bcrypt hash. We are using it in our passport strategy for converting plain password strings to bcrypt hash before storing them in the database. validPassword method will take in a plain text password and validate it by comparing it to bcrypt hash stored in our database. generateStreamKey method will generate a unique string that we will issue to users as their streaming key for RTMP clients.
let mongoose = require('mongoose');

exports.User = mongoose.model('User', require('./UserSchema'));
Now that we have defined our passport strategies, added user schema and created a model from it, let’s initialize passport in app.js.
// Add on the top next to imports
const passport = require('./auth/passport');

app.use(passport.initialize());
app.use(passport.session());
Also, register these routes in the app.js file.
// Register app routes

app.use('/login', require('./routes/login'));
app.use('/register', require('./routes/register'));
Create a login.js and register.js file under routes directory where we will define these routes and use passport middleware for registration and authentication.
const express = require('express'),
    router = express.Router(),
    passport = require('passport');

router.get('/',
    require('connect-ensure-login').ensureLoggedOut(),
    (req, res) => {
        res.render('login', {
            user : null,
            errors : {
                email : req.flash('email'),
                password : req.flash('password')
            }
        });
    });

router.post('/', passport.authenticate('localLogin', {
    successRedirect : '/',
    failureRedirect : '/login',
    failureFlash : true
}));

module.exports = router;

const express = require('express'),
    router = express.Router(),
    passport = require('passport');

router.get('/',
    require('connect-ensure-login').ensureLoggedOut(),
    (req, res) => {
        res.render('register', {
            user : null,
            errors : {
                username : req.flash('username'),
                email : req.flash('email')
            }
        });
    });

router.post('/',
    require('connect-ensure-login').ensureLoggedOut(),
    passport.authenticate('localRegister', {
        successRedirect : '/',
        failureRedirect : '/register',
        failureFlash : true
    })
);

module.exports = router;
We are using ejs templating engine. Add login.ejs and register.ejs template to views directory and add the following code
<!doctype html>
<html lang="en">
<% include header.ejs %>
<body>
<% include navbar.ejs %>

<div class="container app mt-5">
    <h4>Login</h4>

    <hr class="my-4">
    <div class="row">
        <form action="/login" method="post" class="col-xs-12 col-sm-12 col-md-8 col-lg-6">
            <div class="form-group">
                <label>Email address</label>
                <input type="email" name="email" class="form-control" placeholder="Enter email" required>
                <% if (errors.email.length) { %>
                    <small class="form-text text-danger"><%= errors.email %></small>
                <% } %>
            </div>
            <div class="form-group">
                <label>Password</label>
                <input type="password" name="password" class="form-control" placeholder="Password" required>
                <% if (errors.password.length) { %>
                    <small class="form-text text-danger"><%= errors.password %></small>
                <% } %>
            </div>
            <div class="form-group">
                <div class="leader">
                    Don't have an account? Register <a href="/register">here</a>.
                </div>
            </div>
            <button type="submit" class="btn btn-dark btn-block">Login</button>
        </form>
    </div>
</div>

<% include footer.ejs %>
</body>
</html>

<!doctype html>
<html lang="en">
<% include header.ejs %>
<body>
<% include navbar.ejs %>

<div class="container app mt-5">
    <h4>Register</h4>

    <hr class="my-4">

    <div class="row">
        <form action="/register"
              method="post"
              class="col-xs-12 col-sm-12 col-md-8 col-lg-6">

            <div class="form-group">
                <label>Username</label>
                <input type="text" name="username" class="form-control" placeholder="Enter username" required>
                <% if (errors.username.length) { %>
                    <small class="form-text text-danger"><%= errors.username %></small>
                <% } %>
            </div>

            <div class="form-group">
                <label>Email address</label>
                <input type="email" name="email" class="form-control" placeholder="Enter email" required>
                <% if (errors.email.length) { %>
                    <small class="form-text text-danger"><%= errors.email %></small>
                <% } %>
            </div>

            <div class="form-group">
                <label>Password</label>
                <input type="password" name="password" class="form-control" placeholder="Password" required>
            </div>

            <div class="form-group">
                <div class="leader">
                    Have an account? Login <a href="/login">here</a>.
                </div>
            </div>

            <button type="submit" class="btn btn-dark btn-block">Register</button>
        </form>
    </div>
</div>

<% include footer.ejs %>
</body>
</html>
We are pretty much done with authentication. Now we will move onto the next part of this tutorial and set up our RTMP server.
Setting up an RTMP server
Real-Time Messaging Protocol (RTMP) was designed for high-performance transmission of video, audio, and data between broadcaster and server. Twitch, Facebook, Youtube, and many other sites who offer live streaming accepts RTMP streams and transcodes then into HTTP streams (HLS format) before distributing them to their CDNs for high availability.
We are using node-media-server, a Node.js implementation of RTMP media server. It accepts RTMP streams and remux them to HLS/DASH using ffmpeg. Make sure you have ffmpeg installed on your system. If you are running Linux and already have ffmpeg installed, you can find your installation path by running this command from the terminal.
$ which ffmpeg

# /usr/bin/ffmpeg
node-media-server recommends ffmpeg 4.x version. You can check your version by running this command.
$ ffmpeg --version

# ffmpeg version 4.1.3-0york1~18.04 Copyright (c) 2000-2019 the

# FFmpeg developers built with gcc 7 (Ubuntu 7.3.0-27ubuntu1~18.04)
If you don’t have ffmpeg installed and running Ubuntu, you can install it by running these commands from the terminal.
# Add PPA. If you install without PPA, it will install

# ffmpeg version 3.x.

$ sudo add-apt-repository ppa:jonathonf/ffmpeg-4

$ sudo apt install ffmpeg
If you are running Windows, you can download ffmpeg windows builds. Add this config file to your project.
const config = {
    server: {
        secret: 'kjVkuti2xAyF3JGCzSZTk0YWM5JhI9mgQW4rytXc'
    },
    rtmp_server: {
        rtmp: {
            port: 1935,
            chunk_size: 60000,
            gop_cache: true,
            ping: 60,
            ping_timeout: 30
        },
        http: {
            port: 8888,
            mediaroot: './server/media',
            allow_origin: '*'
        },
        trans: {
            ffmpeg: '/usr/bin/ffmpeg',
            tasks: [
                {
                    app: 'live',
                    hls: true,
                    hlsFlags: '[hls_time=2:hls_list_size=3:hls_flags=delete_segments]',
                    dash: true,
                    dashFlags: '[f=dash:window_size=3:extra_window_size=5]'
                }
            ]
        }
    }
};

module.exports = config;
Change ffmpeg value to your own ffmpeg installation path. If you’re running windows and downloaded Windows builds from the above link, make sure you add .exe extension add the end of your path.
const config = {

        ....

        trans: {

            ffmpeg: 'D:/ffmpeg/bin/ffmpeg.exe',

            ...

        }

    }

};
Also, install node-media-server by running
$ npm install node-media-server --save
Create media_server.js file and add this code.
const NodeMediaServer = require('node-media-server'),

    config = require('./config/default').rtmp_server;


nms = new NodeMediaServer(config);


nms.on('prePublish', async (id, StreamPath, args) => {

    let stream_key = getStreamKeyFromStreamPath(StreamPath);

    console.log('[NodeEvent on prePublish]', `id=${id} StreamPath=${StreamPath} args=${JSON.stringify(args)}`);

});


const getStreamKeyFromStreamPath = (path) => {

    let parts = path.split('/');

    return parts[parts.length - 1];

};


module.exports = nms;
NodeMediaServer usage is pretty straight forward. It runs an RTMP server and lets you listen to connection events. You can reject an incoming connection if a streaming key is invalid. We will be listening to its prePublish event. We will add more code inside prePublish event listener closure to reject incoming connections with invalid streaming keys in the next part of this tutorial. For now, we are accepting all incoming connection on default 1935 RTMP port. Now, all we have to do is import nms object in the app.js file and call its run method.
// Add this on the top of app.js file
// next to all imports
const node_media_server = require('./media_server');

// and call run() method at the end
// file where we start our web server

node_media_server.run();
Download Open Broadcaster Software (OBS) and install it on your PC. Go to Settings > Stream. Select Custom service and enter rtmp://127.0.0.1:1935/live in Server input. You can leave Stream Key input empty or add a random string if it doesn’t let you save settings. Click Apply and Ok. Click start streaming button to broadcast your RTMP stream to your local server.

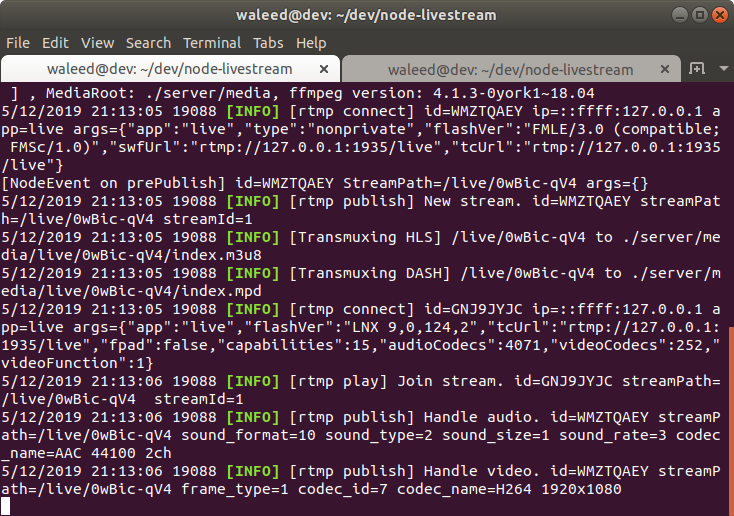
Head over to your terminal to see the output from your node media server. You will see an incoming stream with a few events listener logs.
Node media server exposes an API to list all connected clients. You can access it in your browser at http://127.0.0.1:8888/api/streams. Later on, we will use this API in our frontend React app to show live streaming users. You will see an output like this.
{

  "live": {

    "0wBic-qV4": {

      "publisher": {

        "app": "live",

        "stream": "0wBic-qV4",

        "clientId": "WMZTQAEY",

        "connectCreated": "2019-05-12T16:13:05.759Z",

        "bytes": 33941836,

        "ip": "::ffff:127.0.0.1",

        "audio": {

          "codec": "AAC",

          "profile": "LC",

          "samplerate": 44100,

          "channels": 2

        },

        "video": {

          "codec": "H264",

          "width": 1920,

          "height": 1080,

          "profile": "High",

          "level": 4.2,

          "fps": 60

        }

      },

      "subscribers": [

        {

          "app": "live",

          "stream": "0wBic-qV4",

          "clientId": "GNJ9JYJC",

          "connectCreated": "2019-05-12T16:13:05.985Z",

          "bytes": 33979083,

          "ip": "::ffff:127.0.0.1",

          "protocol": "rtmp"

        }

      ]

    }

  }

}
Xem phần 2: Viết tiếp backend và frontend ứng dụng Live Streaming thời dịch bệnh Covid-19


 là gì, kiến trúc, phân loại?")


