Khanh Hoang - Kenn
Kenn is a user experience designer and front end developer who enjoys creating beautiful and usable web and mobile experiences.
CRUD sẽ làm cho mọi thừ đơn giản, hãy dùng nó để bắt đầu việc ... đọc hiểu. Chạy các lệnh sau:
php app/console doctrine:generate:crud --entity=AplusDemoBundle:Post --route-prefix=post --with-write --format=yml
php app/console cache:clear
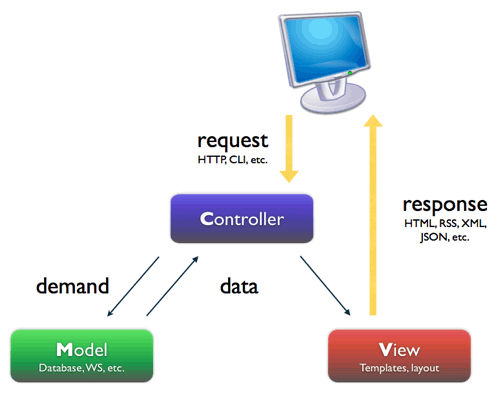
Với kiến trúc của Symfony2:
Mặc định Symfony2 dùng template engine là Twig.
Twig định nghĩa 2 cú pháp đặc biệt:
{{ ... }}: "Says something": prints a variable or the result of an expression to the template;
{% ... %}: "Does something": a tag that controls the logic of the template; it is used to execute statements such as for-loops for example.
Với Twig, chúng ta có thể định nghĩa block. Twig block có thể chứa nội dung mặc định (xem title block bên dưới), nội dung mặc định này có thể được thay thế hoặc được kế thừa.
Tạo tập tin “/var/www/sfdemo/src/Aplus/DemoBundle/Resources/views/layout.html.twig” với nội dung:
<!DOCTYPE html>
<html lang="en">
    <head>
        <meta charset="UTF-8" />
        <title>{% block title %}Demo Bundle{% endblock %}</title>
        <link rel="stylesheet" href="{{ asset('bundles/aplusdemo/css/style.css') }}" />
    </head>
    <body>
        <div id="wrapper">
            <div class="content">
                {% block content %}
                    This is a content block.
                {% endblock %}
            </div>
        </div>
    </body>
</html>
Ghi chú: Chúng ta có thể thay thế {% block content %} bằng {% block anything %}
Một template cơ bản như sau:
{% extends 'AplusDemoBundle::layout.html.twig' %}
{% block content %}
<!-- original template code goes here -->
{% endblock %}
{% block xyz %}block xyz content{% endblock %}
Ghi chú:
Xem router đã được tạo ra với câu lệnh phát sinh CRUD tại /var/www/sfdemo/src/Aplus/DemoBundle/Resources/config/routing/post.yml
Tập tin “/var/www/sfdemo/app/config/routing.yml” sẽ nhập các thiết lập từ “/var/www/sfdemo/src/Aplus/DemoBundle/Resources/config/routing/post.yml”. Hàm path bên dưới phát sinh ra url, với post_new được định nghĩa trong file routing.
<ul>
    <li>
        <a href="{{ path('post_new') }}">
            Create a new entry
        </a>
    </li>
</ul>Xem controller được tạo ra với câu lệnh phát sinh CRUD tại: “/var/www/sfdemo/src/Aplus/DemoBundle/Controller/PostController.php”.
Giờ lấy ví dụ, chúng ta muốn tạo một yêu cầu ajax với
và muốn nhận kết quả là json với status (boolean:true||false) và message (string).
thì làm bằng cách nào?
post_comment_delete:
    pattern:  /delete-comment
    defaults: { _controller: "AplusDemoBundle:Post:deletecomment" }
    requirements: { _method: post }
public function deletecommentAction()
    {
        $isAjax = $this->get('Request')->isXMLHttpRequest();
        if ($isAjax) {
            //...
            //return json
            $return = array(
                'status' => true,
                'msg' => 'Comment <b>xyz</b> has been deleted.'
            );
            return new Response(json_encode($return), 200, array('Content-Type' => 'application/json'));
        }
        return new Response('This is not ajax!', 400);
    }
Ghi chú: nhớ thêm vào tâp tin trên 1 dòng tham chiếu như bên dưới (bởi vì chúng ta sử dụng một class tên là Response):
use Symfony\Component\HttpFoundation\Response;

Kenn is a user experience designer and front end developer who enjoys creating beautiful and usable web and mobile experiences.
![]()


Drush, GIT, scp, Rsync, Virtualbox, Nginx, Apache, MySQL, MariaDB, Percona DB, PHP, CGI, FastCGI, PHP-FPM, APC, BARRACUDA, Aegir, Hosting reviews
REqual column width: Mặc định độ rộng các cọt bằng nhau. Nếu để £ thì có thể điều chỉnh độ rộng các cột khác nhau tùy thích.
Bạn và bé đã biết cách điều khiển nhân vật bằng bàn phím. Ta thử bày trò mới: điều khiển nhân vật bằng con chuột.


")


 từ cổng port 1433")


