![[Phần 3] - The Blog Model: Sử dụng Doctrine 2 và Data Fixtures](https://expressmagazine.net/sites/default/files/imagesArticle/blog_show.jpg "[Phần 3] - The Blog Model: Sử dụng Doctrine 2 và Data Fixtures")
Khanh Hoang - Kenn
Kenn is a user experience designer and front end developer who enjoys creating beautiful and usable web and mobile experiences.
This chapter will begin to explore the blog model. The model will be implemented using the Doctrine 2 Object Relation Mapper (ORM). Doctrine 2 provides us with persistence for our PHP objects. It also provides a proprietary SQL dialect called the Doctrine Query Language (DQL). In addition to Doctrine 2, we will also be introduced to the concept of Data Fixtures. Data fixtures are a mechanism to populate our development and testing databases with suitable test data. At the end of this chapter you will have defined the blog model, updated the database to reflect the new model, and created some data fixtures. You will also have built the basics of the show blog page.
For our blog to function we need a way to persist data. Doctrine 2 provides an ORM library designed exactly for this purpose. The Doctrine 2 ORM sits on top of a powerful Database Abstraction Layer that gives us storage abstraction via the PHP PDO. This allows us to use a number of different storage engines including MySQL, PostgreSQL and SQLite. We will use MySQL for our storage engine, but any other engine could easily be substituted.
Tip
If you are not familiar with ORMs, we will explain the basic principle of them. The definition from Wikipedia reads:
“Object-relational mapping (ORM, O/RM, and O/R mapping) in computer software is a programming technique for converting data between incompatible type systems in object-oriented programming languages. This creates, in effect, a “virtual object database” that can be used from within the programming language.”
What the ORM facilitates is translating the data from a relational database such as MySQL into PHP objects that we can manipulate. This allows us to encapsuate the functionality we require on a table within a class. Think of a user table, it probably has fields like username, password, first_name, last_name, email and dob. With an ORM this becomes a class with members username, password, first_name, etc which allows us to call methods such as getUsername() and setPassword(). ORMs go much further than this though, they are also able to retrieve related tables for us, either at the same time as we retrieve the user object, or lazily later on. Now consider our user has some friends related to it. This would be a friends table, storing the primary key of the user table within it. Using the ORM we could now make a call such as $user->getFriends() to retrieve objects of the friends table. If that’s not enough, the ORM also deals with persitence so we can create objects in PHP, call a method such as save() and let the ORM deal with the details of actually persisting the data to the database. As we are using the Doctrine 2 ORM library, you will become much more familiar with what an ORM is as we progress through this tutorial.
Note
While this tutorial will use the Doctrine 2 ORM library, you could opt to use the Doctrine 2 Object Document Mapper (ODM) library. There are a number of variations of this library including implementations for MongoDB and CouchDB. See the Doctrine Projects page for more information.
There is also a cookbook article that explains how to setup ODM with Symfony2.
We will begin by creating the Blog entity class. We have already been introduced to entities in the previous chapter when we created the Enquiry entity. As the purpose of an entity is to hold data, it makes perfect sense to use one to represent a blog entry. By defining an entity we are not automatically saying the data will be mapped to the database. We saw this with our Enquiry entity where the data held in the entity was just emailed to the webmaster.
Create a new file located at src/Blogger/BlogBundle/Entity/Blog.php and paste in the following.
<?php
// src/Blogger/BlogBundle/Entity/Blog.php

namespace Blogger\BlogBundle\Entity;

class Blog
{
    protected $title;

    protected $author;

    protected $blog;

    protected $image;

    protected $tags;

    protected $comments;

    protected $created;

    protected $updated;
}
As you can see this is simple PHP class. It extends no parent and has no accessors. Each of the members is declared as protected so we are unable to access them when operating on an object of this class. We could declare the getters and setters for these attributes ourself, but Doctrine 2 provides a task to do this. After all, writing accessors is not the most exhilarating of coding tasks.
Before we can run this task, we need to inform Doctrine 2 how the Blog entity should be mapped to the database. The information is specified as metadata using Doctrine 2 mappings. The metadata can be specified in and number of formats including YAML, PHP, XML and Annotations. We will use Annotations in this tutorial. It is important to note that not all members in the entity need to be persisted, so we won’t provide metadata for these. This gives us the flexibility to choose only the members we require Doctrine 2 to map to the database. Replace the content of the Blog entity class located at src/Blogger/BlogBundle/Entity/Blog.php with the following.
<?php
// src/Blogger/BlogBundle/Entity/Blog.php

namespace Blogger\BlogBundle\Entity;

use Doctrine\ORM\Mapping as ORM;

/**
 * @ORM\Entity
 * @ORM\Table(name="blog")
 */
class Blog
{
    /**
     * @ORM\Id
     * @ORM\Column(type="integer")
     * @ORM\GeneratedValue(strategy="AUTO")
     */
    protected $id;

    /**
     * @ORM\Column(type="string")
     */
    protected $title;

    /**
     * @ORM\Column(type="string", length=100)
     */
    protected $author;

    /**
     * @ORM\Column(type="text")
     */
    protected $blog;

    /**
     * @ORM\Column(type="string", length=20)
     */
    protected $image;

    /**
     * @ORM\Column(type="text")
     */
    protected $tags;

    protected $comments;

    /**
     * @ORM\Column(type="datetime")
     */
    protected $created;

    /**
     * @ORM\Column(type="datetime")
     */
    protected $updated;
}
First we import and alias the Doctrine 2 ORM Mappings namespace. This allows us to use annotations to describe the metadata for the entity. The metadata provides information on how the members should be mapped to the database.
Tip
We have only used a small subset of the provided Doctrine 2 mapping types. A full list of mapping types can be found on the Doctrine 2 website. Other mapping types will be introduced later in the tutorial.
The keen eyed among you may have noticed that the $comments member has no metadata attached. This is because we don’t need this persisted, it will just provide a collection of comments related to a blog post. If you think of this without the database in mind it makes sense. The following code snippets will demonstrate this.
// Create a blog object.
$blog = new Blog();
$blog->setTitle("symblog - A Symfony2 Tutorial");
$blog->setAuthor("dsyph3r");
$blog->setBlog("symblog is a fully featured blogging website ...");

// Create a comment and add it to our blog
$comment = new Comment();
$comment->setComment("Symfony2 rocks!");
$blog->addComment($comment);
The above snippet demonstrates the normal behavior you’d want from a blog and comment class. Internally the $blog->addComment() method could be implemented as follows.
class Blog
{
    protected $comments = array();

    public function addComment(Comment $comment)
    {
        $this->comments[] = $comment;
    }
}
The addComment method just adds a new comment object to the blog’s $comments member. Retrieving the comments would also be simple.
class Blog
{
    protected $comments = array();

    public function getComments()
    {
        return $this->comments;
    }
}
As you can see the $comments member is just a list of Comment objects. Doctrine 2 doesn’t change how this works. Doctrine 2 will be able to automatically populate this $comments member with objects related to the blog object.
Now that we have told Doctrine 2 how to map the entity members, we can generate the accessor methods using the following.
$ php app/console doctrine:generate:entities Blogger
You will notice the Blog Entity has been updated with accessor methods. Each time we make a change to the ORM metadata for our entity classes we can run this to generate any additional acccessors. This command will not make amendments to accessors that already existing in the entity, so your existing accessor methods will never be overridden by this command. This is important as you may later customise some of the default accessors.
Tip
While we have used annotations in our entity, it is possible to convert the mapping information into the other supported mapping formats using thedoctrine:mapping:convert task. For example, the following command will convert the mappings in the above entity into the yaml format.
$ php app/console doctrine:mapping:convert --namespace="Blogger\BlogBundle\Entity\Blog" yaml src/Blogger/BlogBundle/Resources/config/doctrineThis will create a file located at src/Blogger/BlogBundle/Resources/config/doctrine/Blogger.BlogBundle.Entity.Blog.orm.yml that will contain theblog entity mappings in yaml format.
If you followed along in chapter 1 of the tutorial, you should have used the web configurator to set the database settings. If you didn’t, update the database_*options in the parameters file located at app/config/parameters.ini.
It’s now time to create the database using another Doctrine 2 task. This task only creates the database, it does not create any tables inside the database. If a database with the same name already exists the task will throw an error and the existing database will be left intact.
$ php app/console doctrine:database:create
We are now ready to create the Blog entity representation in the database. There are 2 ways we can achieve this. We can use the Doctrine 2 schema tasks to update the database or we can use the more powerful Doctrine 2 migrations. For now we will use the schema task. Doctrine Migrations will be introduced in the following chapter.
To create the blog table in our database we can run the following doctrine task.
$ php app/console doctrine:schema:create
This will execute the SQL needed to generate the database schema for the blog entity. You can also pass in the --dump-sql option for the task to dump out the SQL instead of executing it against the database. If you view your database you will see the blog table has been created, with the fields we setup mapping information for.
Tip
We have used a number of the Symfony2 command line task now, and in true command line task format they all provide help by specifying the --helpoption. To see the help details for the doctrine:schema:create task, run the following
$ php app/console doctrine:schema:create --helpThe help information will be output showing the usage, and available options. Most tasks come with a number of options that can be set to customise the running of the task.
Now we have the Blog entity created, and the database updated to reflect this, we can start integrating the model into the view. We will start by building the show page of our blog.
We begin by creating a route for the blog show action. A blog will be identified by its unique ID, so this ID will need to be present in the URL. Update theBloggerBlogBundle routing located at src/Blogger/BlogBundle/Resources/config/routing.yml with the following
# src/Blogger/BlogBundle/Resources/config/routing.yml
BloggerBlogBundle_blog_show:
    pattern:  /{id}
    defaults: { _controller: BloggerBlogBundle:Blog:show }
    requirements:
        _method:  GET
        id: \d+
As the blog ID must be present in the URL, we have specified an id placeholder. This means URLs like http://symblog.co.uk/1 and http://symblog.co.uk/my-blog will match this route. However, we know the blog ID must be a integer (it’s defined this way in the entity mappings) so we can add a constraint that specifies this route only matches when the id parameter contains an integer. This is achieved with the id: \d+ route requirement. Now only the first URL example of the previous would match, http://symblog.co.uk/my-blog would no longer match this route. You can also see a matching route will execute the show action of theBloggerBlogBundle Blog controller. This controller is yet to be created.
The glue between the Model and the View is the controller, so this is where we will begin creating the show page. We could add the show action to our existing Pagecontroller but as this page is concerned with showing blog entities it would be better suited in its own Blog controller.
Create a new file located at src/Blogger/BlogBundle/Controller/BlogController.php and paste in the following.
<?php
// src/Blogger/BlogBundle/Controller/BlogController.php

namespace Blogger\BlogBundle\Controller;

use Symfony\Bundle\FrameworkBundle\Controller\Controller;

/**
 * Blog controller.
 */
class BlogController extends Controller
{
    /**
     * Show a blog entry
     */
    public function showAction($id)
    {
        $em = $this->getDoctrine()->getEntityManager();

        $blog = $em->getRepository('BloggerBlogBundle:Blog')->find($id);

        if (!$blog) {
            throw $this->createNotFoundException('Unable to find Blog post.');
        }

        return $this->render('BloggerBlogBundle:Blog:show.html.twig', array(
            'blog'      => $blog,
        ));
    }
}
We have created a new Controller for the Blog entity and defined the show action. As we specified a id parameter in the BloggerBlogBundle_blog_show routing rule, it will be passed in as an argument to the showAction method. If we had specified more parameters in the routing rule, they would also be passed in as separate arguments.
Tip
The controller actions will also pass over an object of Symfony\Component\HttpFoundation\Request if you specify this as a parameter. This can be useful when dealing with forms. We have already used a form in chapter 2, but we did not use this method as we used one of theSymfony\Bundle\FrameworkBundle\Controller\Controller helper methods as follows.
// src/Blogger/BlogBundle/Controller/PageController.php
public function contactAction()
{
    // ..
    $request = $this->getRequest();
}
We could have instead written this as follows.
// src/Blogger/BlogBundle/Controller/PageController.php

use Symfony\Component\HttpFoundation\Request;

public function contactAction(Request $request)
{
    // ..
}
Both methods achieve the same task. If your controller did not extend the Symfony\Bundle\FrameworkBundle\Controller\Controller helper class you would not be able to use the first method.
Next we need to retrieve the Blog entity from the database. We first use another helper method of the Symfony\Bundle\FrameworkBundle\Controller\Controllerclass to get the Doctrine2 Entity Manager. The job of the Entity Manager is to handle the retrieval and persistence of objects to and from the database. We then use the EntityManager object to get the Doctrine2 Repository for the BloggerBlogBundle:Blog entity. The syntax specified here is simply a short cut that can be used with Doctrine 2 instead of specifying the full entity name, i.e. Blogger\BlogBundle\Entity\Blog. With the repository object we call the find() method passing in the $id argument. This method will retrieve the object by its primary key.
Finally we check that an entity was found, and pass this entity over to the view. If no entity was found a createNotFoundException is thrown. This will ultimately generate a 404 Not Found response.
Tip
The repository object gives you access to a number of useful helper methods including
// Return entities where 'author' matches 'dsyph3r'
$em->getRepository('BloggerBlogBundle:Blog')->findBy(array('author' => 'dsyph3r'));

// Return one entity where 'slug' matches 'symblog-tutorial'
$em->getRepository('BloggerBlogBundle:Blog')->findOneBySlug('symblog-tutorial');
We will create our own custom Repository classes in the next chapter when we require more complex queries.
Now we have built the show action for the Blog controller we can focus on displaying the Blog entity. As specified in the show action the templateBloggerBlogBundle:Blog:show.html.twig will be rendered. Let’s create this template located at src/Blogger/BlogBundle/Resouces/views/Blog/show.html.twigand paste in the following.
{# src/Blogger/BlogBundle/Resouces/views/Blog/show.html.twig #}
{% extends 'BloggerBlogBundle::layout.html.twig' %}

{% block title %}{{ blog.title }}{% endblock %}

{% block body %}
    <article class="blog">
        <header>
            <div class="date"><time datetime="{{ blog.created|date('c') }}">{{ blog.created|date('l, F j, Y') }}</time></div>
            <h2>{{ blog.title }}</h2>
        </header>
        <img src="{{ asset(['images/', blog.image]|join) }}" alt="{{ blog.title }} image not found" class="large" />
        <div>
            <p>{{ blog.blog }}</p>
        </div>
    </article>
{% endblock %}
As you’d expect we begin by extending the BloggerBlogBundle main layout. Next we override the page title with the title of the blog. This will be useful for SEO as the page title of the blog is more descriptive than the default title that is set. Lastly we override the body block to output the Blog entity conent. We use the assetfunction again here to render the blog image. The blog images should be placed in the web/images folder.
In order to ensure the blog show page looks beautiful, we need to add some styling. Update the stylesheet located atsrc/Blogger/BlogBundle/Resouces/public/css/blog.css with the following.
.date { margin-bottom: 20px; border-bottom: 1px solid #ccc; font-size: 24px; color: #666; line-height: 30px }
.blog { margin-bottom: 20px; }
.blog img { width: 190px; float: left; padding: 5px; border: 1px solid #ccc; margin: 0 10px 10px 0; }
.blog .meta { clear: left; margin-bottom: 20px; }
.blog .snippet p.continue { margin-bottom: 0; text-align: right; }
.blog .meta { font-style: italic; font-size: 12px; color: #666; }
.blog .meta p { margin-bottom: 5px; line-height: 1.2em; }
.blog img.large { width: 300px; min-height: 165px; }
Note
If you are not using the symlink method for referencing bundle assets into the web folder you must re-run the assets install task now to copy over the changes to your CSS.
$ php app/console assets:install web
As we have now built the controller and the view for the show actions lets have a look at the show page. Point your browser to http://symblog.dev/app_dev.php/1. Not the page you were expecting?

Symfony2 has generated a 404 Not Found response. This is because we have no data in our database, so no entity with id equal to 1 could be found.
You could simply insert a row into the blog table of your database, but we will use a much better method; Data Fixtures.
We can use fixtures to populate the database with some sample/test data. To do this we use the Doctrine Fixtures extension and bundle. The Doctrine Fixtures extension and bundle do not come with the Symfony2 Standard Distribution, we need to manually install them. Fortunately this is an easy task. Open up thecomposer.json file located in the project root and add the Doctrine fixtures extension and bundle to it as follows.
"require": {
    // ...
    "doctrine/doctrine-fixtures-bundle": "dev-master",
    "doctrine/data-fixtures" : "dev-master"
}
Next update the vendors to reflect these changes.
$ php composer.phar update
This will pull down the latest version of each of the repositories from Github and install them to the required location.
Now let’s register the DoctrineFixturesBundle in the kernel located at app/AppKernel.php
// app/AppKernel.php
public function registerBundles()
{
    $bundles = array(
        // ...
        new Doctrine\Bundle\FixturesBundle\DoctrineFixturesBundle(),
        // ...
    );
    // ...
}
We are now ready to define some fixtures for our blogs. Create a fixture file at src/Blogger/BlogBundle/DataFixtures/ORM/BlogFixtures.php and add the following content:
<?php
// src/Blogger/BlogBundle/DataFixtures/ORM/BlogFixtures.php

namespace Blogger\BlogBundle\DataFixtures\ORM;

use Doctrine\Common\DataFixtures\FixtureInterface;
use Doctrine\Common\Persistence\ObjectManager;
use Blogger\BlogBundle\Entity\Blog;

class BlogFixtures implements FixtureInterface
{
    public function load(ObjectManager $manager)
    {
        $blog1 = new Blog();
        $blog1->setTitle('A day with Symfony2');
        $blog1->setBlog('Lorem ipsum dolor sit amet, consectetur adipiscing eletra electrify denim vel ports.\nLorem ipsum dolor sit amet, consectetur adipiscing elit. Morbi ut velocity magna. Etiam vehicula nunc non leo hendrerit commodo. Vestibulum vulputate mauris eget erat congue dapibus imperdiet justo scelerisque. Nulla consectetur tempus nisl vitae viverra. Cras el mauris eget erat congue dapibus imperdiet justo scelerisque. Nulla consectetur tempus nisl vitae viverra. Cras elementum molestie vestibulum. Morbi id quam nisl. Praesent hendrerit, orci sed elementum lobortis, justo mauris lacinia libero, non facilisis purus ipsum non mi. Aliquam sollicitudin, augue id vestibulum iaculis, sem lectus convallis nunc, vel scelerisque lorem tortor ac nunc. Donec pharetra eleifend enim vel porta.');
        $blog1->setImage('beach.jpg');
        $blog1->setAuthor('dsyph3r');
        $blog1->setTags('symfony2, php, paradise, symblog');
        $blog1->setCreated(new \DateTime());
        $blog1->setUpdated($blog1->getCreated());
        $manager->persist($blog1);

        $blog2 = new Blog();
        $blog2->setTitle('The pool on the roof must have a leak');
        $blog2->setBlog('Vestibulum vulputate mauris eget erat congue dapibus imperdiet justo scelerisque. Na. Cras elementum molestie vestibulum. Morbi id quam nisl. Praesent hendrerit, orci sed elementum lobortis.');
        $blog2->setImage('pool_leak.jpg');
        $blog2->setAuthor('Zero Cool');
        $blog2->setTags('pool, leaky, hacked, movie, hacking, symblog');
        $blog2->setCreated(new \DateTime("2011-07-23 06:12:33"));
        $blog2->setUpdated($blog2->getCreated());
        $manager->persist($blog2);

        $blog3 = new Blog();
        $blog3->setTitle('Misdirection. What the eyes see and the ears hear, the mind believes');
        $blog3->setBlog('Lorem ipsumvehicula nunc non leo hendrerit commodo. Vestibulum vulputate mauris eget erat congue dapibus imperdiet justo scelerisque.');
        $blog3->setImage('misdirection.jpg');
        $blog3->setAuthor('Gabriel');
        $blog3->setTags('misdirection, magic, movie, hacking, symblog');
        $blog3->setCreated(new \DateTime("2011-07-16 16:14:06"));
        $blog3->setUpdated($blog3->getCreated());
        $manager->persist($blog3);

        $blog4 = new Blog();
        $blog4->setTitle('The grid - A digital frontier');
        $blog4->setBlog('Lorem commodo. Vestibulum vulputate mauris eget erat congue dapibus imperdiet justo scelerisque. Nulla consectetur tempus nisl vitae viverra.');
        $blog4->setImage('the_grid.jpg');
        $blog4->setAuthor('Kevin Flynn');
        $blog4->setTags('grid, daftpunk, movie, symblog');
        $blog4->setCreated(new \DateTime("2011-06-02 18:54:12"));
        $blog4->setUpdated($blog4->getCreated());
        $manager->persist($blog4);

        $blog5 = new Blog();
        $blog5->setTitle('You\'re either a one or a zero. Alive or dead');
        $blog5->setBlog('Lorem ipsum dolor sit amet, consectetur adipiscing elittibulum vulputate mauris eget erat congue dapibus imperdiet justo scelerisque.');
        $blog5->setImage('one_or_zero.jpg');
        $blog5->setAuthor('Gary Winston');
        $blog5->setTags('binary, one, zero, alive, dead, !trusting, movie, symblog');
        $blog5->setCreated(new \DateTime("2011-04-25 15:34:18"));
        $blog5->setUpdated($blog5->getCreated());
        $manager->persist($blog5);

        $manager->flush();
    }

}
The fixture file demonstrates a number of important features when using Doctrine 2, including how to persist entities to the database.
Let’s look at how we create one blog entry.
$blog1 = new Blog();
$blog1->setTitle('A day in paradise - A day with Symfony2');
$blog1->setBlog('Lorem ipsum dolor sit d us imperdiet justo scelerisque. Nulla consectetur...');
$blog1->setImage('beach.jpg');
$blog1->setAuthor('dsyph3r');
$blog1->setTags('symfony2, php, paradise, symblog');
$blog1->setCreated(new \DateTime());
$blog1->setUpdated($this->getCreated());
$manager->persist($blog1);
// ..

$manager->flush();
We start by creating an object of Blog and setting some values for its members. At this point Doctrine 2 knows nothing about the Entity object. It’s only when we make a call to $manager->persist($blog1) that we instruct Doctrine 2 to start managing this entity object. The $manager object here is an instance of theEntityManager object we saw earlier when retrieving entites from the database. It is important to note that while Doctrine 2 is now aware of the entity object, it is still not persisted to the database. A call to $manager->flush() is required for this. The flush method causes Doctrine 2 to actually interact with the database and action all the entities it is managing. For best performance you should group Doctrine 2 operations together and flush all the actions in one go. This is how we have done so in our fixtures. We create each entity, ask Doctrine 2 to manage it and then flush all operations at the end.
We are now ready to load the fixtures into the database.
$ php app/console doctrine:fixtures:load
If we have a look at the show page at http://symblog.dev/app_dev.php/1 you should see a blog the blog entry.
![[Phần 3] - The Blog Model: Sử dụng Doctrine 2 và Data Fixtures](https://expressmagazine.net/sites/default/files/styles/scale500/public/imagesArticle/blog_show.jpg?itok=xBJji68h "[Phần 3] - The Blog Model: Sử dụng Doctrine 2 và Data Fixtures")
Try changing the id parameter in the URL to 2. You should see the next blog entry being shown.
If you have a look at the URL http://symblog.dev/app_dev.php/100 you should see a 404 Not Found exception being thrown. You’d expect this as there is no Blogentity with an ID of 100. Now try the URL http://symblog.dev/app_dev.php/symfony2-blog. Why don’t we get a 404 Not Found exception? This is because theshow action is never executed. The URL fails to match any route in the application because of the \d+ requirement we set on the BloggerBlogBundle_blog_showroute. This is why you see a No route found for "GET /symfony2-blog" exception.
Finally in this chapter we will look at the 2 timestamp members on the Blog entity; created and updated. The functionality for these 2 members is commonly referred to as the Timestampable behavior. These members hold the time the blog was created and the time the blog was last updated. As we don’t want to have to manually set these fields each time we create or update a blog, we can use Doctrine 2 to help us.
Doctrine 2 comes with an Event System that provides Lifecycle Callbacks. We can use these callback events to register our entities to be notified of events during the entity lifetime. Some example of events we can be notified about include before an update happens, after a persist happens and after a remove happens. In order to use Lifecycle Callbacks on our entity we need to register the entity for them. This is done using metadata on the entity. Update the Blog entity located atsrc/Blogger/BlogBundle/Entity/Blog.php with the following.
<?php
// src/Blogger/BlogBundle/Entity/Blog.php

// ..

/**
 * @ORM\Entity
 * @ORM\Table(name="blog")
 * @ORM\HasLifecycleCallbacks
 */
class Blog
{
    // ..
}
Now let’s add a method in the Blog entity that registers for the PreUpdate event. We also add a constructor to set default values for the created and updatedmembers.
<?php
// src/Blogger/BlogBundle/Entity/Blog.php

// ..

/**
 * @ORM\Entity
 * @ORM\Table(name="blog")
 * @ORM\HasLifecycleCallbacks
 */
class Blog
{
    // ..

    public function __construct()
    {
        $this->setCreated(new \DateTime());
        $this->setUpdated(new \DateTime());
    }

    /**
     * @ORM\PreUpdate
     */
    public function setUpdatedValue()
    {
       $this->setUpdated(new \DateTime());
    }

    // ..
}
We register the Blog entity to be notified on the preUpdate event to set the updated member value. Now when you re-run the load fixtures task you will notice thecreated and updated members are set automatically.
Tip
As timestampable members are such a common requirement for entities, there is a bundle available that supports them. The StofDoctrineExtensionsBundle provides a number of useful Doctrine 2 extensions including Timestampable, Sluggable, and Sortable.
We will look at integrating this bundle later in the tutorial. The eager ones among you can check the cookbook for a chapter on this topic.
We have covered a number of concepts for dealing with models in Doctrine 2. We also looked at defining Data fixtures to provide us will an easy way to get suitable test data into our application duration development and testing.
Next we will look at extending the model further by adding the comment entity. We will start to construct the homepage and create a custom Repository to do this. We will also introduce the concept of Doctrine Migrations and how forms interact with Doctrine 2 to allow comments to be posted for a blog.

Kenn is a user experience designer and front end developer who enjoys creating beautiful and usable web and mobile experiences.
![]()


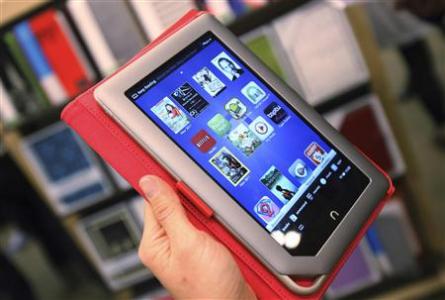
Ngay sau khi Amazon.com tung ra phiên bản máy tính bảng Kindle giá rẻ 199 USD và cháy hàng, mới đây Barnes & Noble quyết định tung ra máy tính bảng có tên Nook với cấu hình và dung lượng ấn tượng hơn.
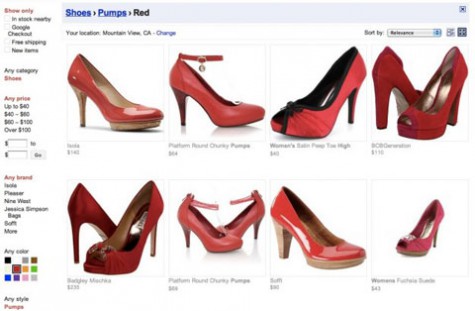
Mới đây, Google đã nâng cấp tính năng tìm kiếm sản phẩm Product Search để giúp người dùng có thể mua sắm một cách thông minh nhất.
Hàng loạt trang công nghệ vừa công bố những bằng chứng cho thấy Apple có vẻ như đang tiến hành thử nghiệm iOS 6, phiên bản mới của hệ điều hành dành cho các thiết bị di động.


")


")


")
Bình luận (0)
Add Comment