Khanh Hoang - Kenn
Kenn is a user experience designer and front end developer who enjoys creating beautiful and usable web and mobile experiences.
Tải về “Symfony Standard” tại http://symfony.com/download
Giải nén → đổi tên thư mục Symfony thành sfdemo, sao chép vào thư mục “/var/www”
Mở tập tin “/etc/hosts”, thêm vào “127.0.0.1 sfdemo.t”
Tạo tập tin “/etc/apache2/sites-available/sfdemo.t” với nội dung như sau:
<VirtualHost *:80>
    ServerName sfdemo.t
    DocumentRoot /var/www/sfdemo/web
    DirectoryIndex app.php
    ErrorLog /var/www/logs/sfdemo-error.log
    CustomLog /var/www/logs/sfdemo-access.log combined
    <Directory "/var/www/sfdemo/web">
        AllowOverride All
        Allow from All
    </Directory>
</VirtualHost>
Chạy dòng lệnh:
sudo a2ensite sfdemo.t
sudo /etc/init.d/apache2 reload
Mở trình duyệt web với địa chỉ “http://sfdemo.t/app_dev.php”.
Sửa thông tin kết nối CSDL tại “/var/www/sfdemo/app/config/parameters.yml”
Chạy các dòng lệnh sau:
cd /var/www/sfdemo
php app/console doctrine:database:create
php app/console generate:bundle --namespace=Aplus/DemoBundle --format=yml
   Trả lời một vài câu hỏi được đưa ra:
       Bundle namespace [Aplus/DemoBundle]: Aplus/DemoBundle
       Bundle name [AplusDemoBundle]: AplusDemoBundle
       Target directory [/var/www/sfdemo/src]: /var/www/sfdemo/src
       Configuration format (yml, xml, php, or annotation) [yml]: yml
       Do you want to generate the whole directory structure [no]? yes
       Do you confirm generation [yes]? yes
       Confirm automatic update of your Kernel [yes]? yes
       Confirm automatic update of the Routing [yes]? Yes
php app/console cache:clearChúng ta sẽ tạo 1 cái blog đơn giản với hai bảng là post và comment.
Tạo tập tin “/var/www/sfdemo/src/Aplus/DemoBundle/Resources/config/doctrine/Post.orm.yml” với nội dung:
Aplus\DemoBundle\Entity\Post:
  type: entity
  table: post
  id:
    id:
      type: integer
      generator: { strategy: AUTO }
  fields:
    name:
      type: string
      length: 255
    title:
      type: string
      length: 255
    content:
      type: text
    created_at:
      type: datetime
    updated_at:
      type: datetime
  oneToMany:
    comment:
      targetEntity: Comment
      mappedBy: post
Tạo tập tin “/var/www/sfdemo/src/Aplus/DemoBundle/Resources/config/doctrine/Comment.orm.yml” với nội dung:
Aplus\DemoBundle\Entity\Comment:
  type: entity
  table: comment
  id:
    id:
      type: integer
      generator: { strategy: AUTO }
  fields:
    commenter:
      type: string
      length: 255
    body:
      type: text
    post_id:
      type: integer
    created_at:
      type: datetime
    updated_at:
      type: datetime
  manyToOne:
    post:
      targetEntity: Post
      inversedBy: comment
      joinColumn:
        name: post_id
        referencedColumnName: id
Chạy lệnh sau:
php app/console doctrine:generate:entities AplusDemoBundle
Lệnh trên sẽ tạo 2 file php tại /var/www/sfdemo/src/Aplus/DemoBundle/Entity
Nếu muốn cập nhật database, sửa ở các tập tin *.orm.yml trước, sau đó chạy lệnh sau:
php app/console doctrine:schema:update --force
Sửa các tập tin *.orm.yml phía trên, bổ sung repositoryClass:
Aplus\DemoBundle\Entity\Post:
  type: entity
  repositoryClass: Aplus\DemoBundle\Repository\PostRepository
Chạy lệnh:
php app/console doctrine:generate:entities AplusDemoBundle
Lệnh trên sẽ tạo ra tập tin “/var/www/sfdemo/src/Aplus/DemoBundle/Repository/PostRepository.php” với nội dung:
<?php
namespace Aplus\DemoBundle\Repository;
use Doctrine\ORM\EntityRepository;
/**
* PostRepository
*
* This class was generated by the Doctrine ORM. Add your own custom
* repository methods below.
*/
class PostRepository extends EntityRepository
{
}
Thử tạo một hàm đơn giản thế này:
   function getPostList()
    {
        return array();
    }
Và chúng ta có thể gọi nó ở controller như bên dưới.
public function indexAction()
{
  $em = $this->getDoctrine()->getEntityManager();
        $entities = $em->getRepository('AplusDemoBundle:Post')->getPostList();
        return $this->render('AplusDemoBundle:Post:index.html.twig', array(
                    'entities' => $entities
                ));
}Có một cách đơn giản: tạo CRUD, hãy đọc code được tạo ra và hiểu sơ về nó trước.
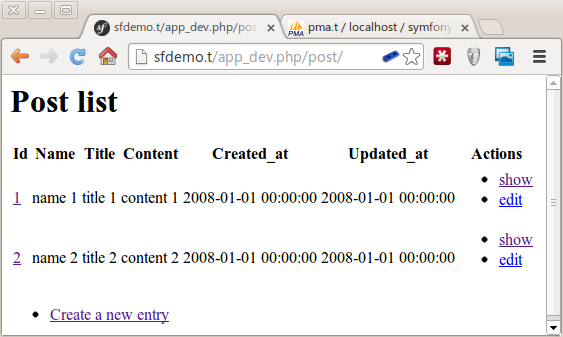
php app/console doctrine:generate:crud --entity=AplusDemoBundle:Post --route-prefix=post --with-write --format=yml
php app/console cache:clear

Kenn is a user experience designer and front end developer who enjoys creating beautiful and usable web and mobile experiences.
![]()


With all the software we teach, some tasks almost always confuse beginners.
PageRank là một chỉ số để Google đánh giá mức độ tin cậy và chất lượng của mỗi webpage trong danh mục của mình. Khi nói đến PageRank người ta thường nghĩ đến ngay Google PageRank.
ShopBack dự kiến hoạt động chính thức ở Việt Nam vào quý II khi vừa nhận thêm 30 triệu USD vốn đầu tư.


")


 = x + x^3 + x^5 + … + x^2n + 1")


")
")
Bình luận (0)
Add Comment