
Khanh Hoang - Kenn
Kenn is a user experience designer and front end developer who enjoys creating beautiful and usable web and mobile experiences.
These instructions describe the installation of MySQL binaries on Linux. They were written while installing on Red Hat 6.1, but should work for any recent version of Linux. These binaries are optimised for i686 computers, if you are using anything else then you should probably install from source.
su root
    cd /usr/local
    ftp ftp.mysql.com       (Name: anonymous) (Password: [enter your email address here])
    cd MySQL-3.23
    bin
    get mysql-3.23.28-gamma-pc-linux-gnu-i686.tar.gz
tar xzf mysql-3.23.28-gamma-pc-linux-gnu-i686.tar.gz
ln -s mysql-3.23.28-gamma-pc-linux-gnu-i686 mysql
Configuring MySQL
    cd mysql
    scripts/mysql_install_db
/usr/sbin/useradd mysql
/usr/sbin/groupadd mysql
cd /usr/local/mysql/data
Once the file is found, we now modify the ownership.
chown -R mysql:mysql . (Make sure the final [space][period], is present, as this specifies which file to modify.)
chmod -R go-rwx . (Once again, remember the final [space][period].)
    cd /usr/local/mysql
    bin/safe_mysqld &
bin/mysqladmin ping
mysqld is alive
bin/mysqladmin -u root password mypass
bin/mysql -uroot -pmypass
To get prompted, just leave off the password. This is more secure since other users may be able to see your command like that above:
bin/mysql -uroot -p
shell> bin/mysql -uroot -pmypass
mysql> create database egineer;
Now I create a database user that will be used by PHP to access this database. I use the same name as the database (egineer) for convenience. Notice that this user only has privileges to select, insert, update and delete. They also only have permission to connect from the local machine. Since the password will be in PHP code it's best to keep the privileges for this user as minimal as possible.
mysql> GRANT SELECT,INSERT,UPDATE,DELETE
           ON egineer.*
           TO egineer@localhost
           IDENTIFIED BY 'mypass';
    Host:     localhost
    User:     egineer
    Password: mypass
mysql
instead of having to qualify the full path to the binary file:
/usr/local/mysql/bin/mysql
Which do you prefer?
/etc/profile
PATH=$PATH:/usr/local/mysql/bin
immediately below the existing command to set the PATH.
~/.bash_profile
It's convenient to have MySQL start automatically with your machine. It's also wise if you have an unattended web server that might be rebooted for reasons beyond your control. These instructions explain how to set it up on Red Hat Linux.

Kenn is a user experience designer and front end developer who enjoys creating beautiful and usable web and mobile experiences.
![]()


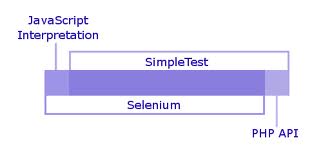
PHP is a language that traditionally has not had unit testing as part of the development process. A large part of that was that way back when, there just weren’t any good tools for doing testing.
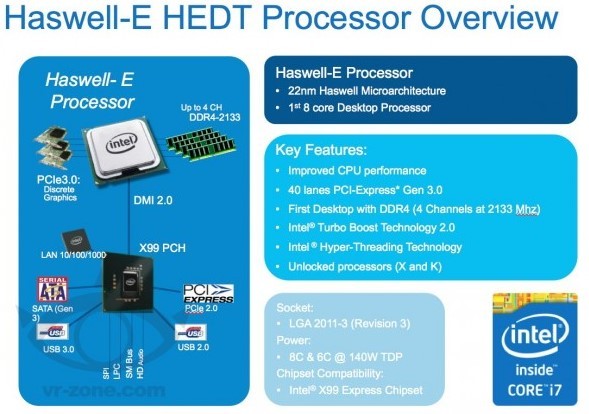
Với Haswell-E, Intel có thể sẽ tung chip 6 nhân dòng giá rẻ hứa hẹn sẽ chỉ có giá khoảng 400 USD, còn chip 8 nhân có giá khoảng 600 USD. Bản chip 8 nhân Extreme Edition sẽ có giá ở mức 1000 USD.
Người dùng Facebook trước giờ luôn có nhu cầu chia sẻ những dữ liệu nào đó với bạn bè của mình. Chức năng chia sẻ file cho những người trong cùng Group là một lựa chọn quen thuộc.


")


 = x + x^2 + x^3 + … + x^n")


