As a Drupal developer, you might have come with a situation where you have to integrate Drupal websites with other third-party system. So here third party systems provide data in a CSV or excel format that we have to show in the Drupal website.
In this case, we have to import this data to one or more content type in Drupal.
There are excel import modules available that will do the job. But in these modules, you can use for direct import to content types. But most of the cases you have to work on each row to clean the data and also various validations on each data and assign to various content type based on conditions in cell values. For these purpose you have to write your own custom code.
So here I am going to explain how we can write our own excel import functionality in our custom module in Drupal 8.
before starting project. Install php spreadsheet library using the below command in your project folder.
composer require phpoffice/phpspreadsheet
1) Import với phpoffice/phpspreadsheet
this will place phpspreadsheet library in your vendors directory and adds below entry in your project composer.json.
“phpoffice/phpspreadsheet”: “^1.8”
You can see library in phpoffice folder inside your project vendors directory.
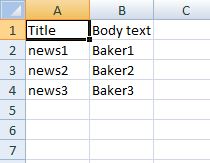
Here I have content type called news and trying to upload below sheet into the news content.

Now we are going to create form in our custom module to import csv file and create content programmatically using phpspreadsheet library. Here my custom module name is digitalnadeem_importexcel
First, we are creating custom form to import CSV or excel sheet.
For this, I have created a new entry in routing .yml file in my module.
digitalnadeem_importexcel.import_excel:
  path: '/admin/structure/digitalnadeem_importexcel/sheet/import'
  defaults:
    _title: 'Upload sheet'
    _form: '\Drupal\digitalnadeem_importexcel\Form\ImportexcelForm'
  requirements:
    _permission: 'Import form'
Next I have created a form ImportExcelForm.php in my module path.
\src\Form\ImportexcelForm.php
First, you have to include spread sheet library classes as shown below
use PhpOffice\PhpSpreadsheet\Spreadsheet;
use PhpOffice\PhpSpreadsheet\IOFactory;
use PhpOffice\PhpSpreadsheet\Style\Fill;
use PhpOffice\PhpSpreadsheet\Cell\DataType;
use PhpOffice\PhpSpreadsheet\Style\Alignment;
use PhpOffice\PhpSpreadsheet\Style\Border;
in buildForm function include the below code to create upload form.
public function buildForm(array $form, FormStateInterface $form_state) {

    $form = array(
      '#attributes' => array('enctype' => 'multipart/form-data'),
    );

    $form['file_upload_details'] = array(
      '#markup' => t('<b>The File</b>'),
    );

    $validators = array(
      'file_validate_extensions' => array('csv'),
    );
    $form['excel_file'] = array(
      '#type' => 'managed_file',
      '#name' => 'excel_file',
      '#title' => t('File *'),
      '#size' => 20,
      '#description' => t('Excel format only'),
      '#upload_validators' => $validators,
      '#upload_location' => 'public://content/excel_files/',
    );

    $form['actions']['#type'] = 'actions';
    $form['actions']['submit'] = array(
      '#type' => 'submit',
      '#value' => $this->t('Save'),
      '#button_type' => 'primary',
    );

    return $form;

  }
Below the upload location, you have to create in your project directory.
‘#upload_location’ => ‘public://content/excel_files/
In my case I have created in folder in below path.
\sites\default\files\content\excel_files
So uploaded files will be stored in this path for processing.
As mentioned in form configuration I have provided csv format only allowed in validation. You can provide xlsx in an array if you are uploading a normal excel sheet.
Also added below validation function.
public function validateForm(array &$form, FormStateInterface $form_state) {
    if ($form_state->getValue('excel_file') == NULL) {
      $form_state->setErrorByName('excel_file', $this->t('upload proper File'));
    }
  }
Now we are going to implement import functionality in our submit form handler.
In submit first we are getting file name that uploaded. And generating path to file uploaded directory .
$file = \Drupal::entityTypeManager()->getStorage('file')
                    ->load($form_state->getValue('excel_file')[0]);
     $full_path = $file->get('uri')->value;
     $file_name = basename($full_path);
Next we are using phpspreadsheet functions to get extract cell values from uploaded document.
The below code will iterate through each row and cells and store values in an array say variable $rows.
$inputFileName = \Drupal::service('file_system')->realpath('public://content/excel_files/'.$file_name);

        $spreadsheet = IOFactory::load($inputFileName);

        $sheetData = $spreadsheet->getActiveSheet();

        $rows = array();
        foreach ($sheetData->getRowIterator() as $row) {
            //echo "<pre>";print_r($row);exit;
            $cellIterator = $row->getCellIterator();
            $cellIterator->setIterateOnlyExistingCells(FALSE);
            $cells = [];
            foreach ($cellIterator as $cell) {
                $cells[] = $cell->getValue();


            }
           $rows[] = $cells;

        }
Here out put of $rows array will be as shown below.
Array
(
    [0] => Array
        (
            [0] => Title
            [1] => Body text
        )

    [1] => Array
        (
            [0] => news1
            [1] => Baker1
        )

    [2] => Array
        (
            [0] => news2
            [1] => Baker2
        )

    [3] => Array
        (
            [0] => news3
            [1] => Baker3
        )

)
Here I used below sheet to import.
Here first row is header row . this we don’t want to import to the news content .So for removing first row use below array_shift function.
array_shift($rows);
Next we are iterating through $rows array to insert rows to news content.
So first we will check wether node exists by comparing title fields.
Se below code to create and update node from excel data.
foreach($rows as $row){
            $values = \Drupal::entityQuery('node')->condition('title', $row[0])->execute();
            $node_not_exists = empty($values);
            if($node_not_exists){
                /*if node does not exist create new node*/
                $node = \Drupal::entityTypeManager()->getStorage('node')->create([
                  'type'       => 'news', //===here news is the content type mechine name
                  'title'      => $row[0],
                  'body'       => 'body content updated'
                ]);
                $node->save();
            }else{
                /*if node exist update the node*/
                $nid = reset($values);

                $node = \Drupal\node\Entity\Node::load($nid);
                $node->setTitle($row[0]);
                $node->set("body", $row[1]);
                //$node->set("field_name", 'New value');
                $node->save();
            }
        }

        \Drupal::messenger()->addMessage('imported successfully');
Now you are done with the implementation. Flush the cache you can see below form while accessing URL – http://your-site.com/admin/structure/digitalnadeem_importexcel/sheet/import
See imported contents in the admin content page.
2) Export với phpoffice/phpspreadsheet
// Create new Spreadsheet object
  $spreadsheet = new Spreadsheet();
  $sheet = $spreadsheet->getActiveSheet();
// Set document properties
    $spreadsheet->getProperties()->setCreator('miraimedia.co.th')
      ->setLastModifiedBy('Cholcool')
      ->setTitle('how to export data to excel use phpspreadsheet in codeigniter')
      ->setSubject('Generate Excel use PhpSpreadsheet in CodeIgniter')
      ->setDescription('Export data to Excel Work for me!');
// add style to the header
    $styleArray = array(
      'font' => array(
        'bold' => true,
      ),
      'alignment' => array(
        'horizontal' => \PhpOffice\PhpSpreadsheet\Style\Alignment::HORIZONTAL_CENTER,
        'vertical'   => \PhpOffice\PhpSpreadsheet\Style\Alignment::HORIZONTAL_CENTER,
      ),
      'borders' => array(
          'bottom' => array(
              'borderStyle' => \PhpOffice\PhpSpreadsheet\Style\Border::BORDER_THICK,
              'color' => array('rgb' => '333333'),
          ),
      ),
      'fill' => array(
        'type'       => \PhpOffice\PhpSpreadsheet\Style\Fill::FILL_GRADIENT_LINEAR,
        'rotation'   => 90,
        'startcolor' => array('rgb' => '0d0d0d'),
        'endColor'   => array('rgb' => 'f2f2f2'),
      ),
    );
    $spreadsheet->getActiveSheet()->getStyle('A1:G1')->applyFromArray($styleArray);
    // auto fit column to content
foreach(range('A', 'G') as $columnID) {
      $spreadsheet->getActiveSheet()->getColumnDimension($columnID)->setAutoSize(true);
    }
// set the names of header cells
      $sheet->setCellValue('A1', 'ID');
      $sheet->setCellValue('B1', 'Name');
      $sheet->setCellValue('C1', 'Age');
      $sheet->setCellValue('D1', 'Sex');
      $sheet->setCellValue('E1', 'Address');
      $sheet->setCellValue('F1', 'Phone');
      $sheet->setCellValue('G1', 'Email');
$getdata = $this->welcome_message->get_sample();
    // Add some data
    $x = 2;
    foreach($getdata as $get){
        $sheet->setCellValue('A'.$x, $get->id);
        $sheet->setCellValue('B'.$x, $get->the_name);
        $sheet->setCellValue('C'.$x, $get->the_age);
        $sheet->setCellValue('D'.$x, $get->the_sex);
        $sheet->setCellValue('E'.$x, $get->the_address);
        $sheet->setCellValue('F'.$x, $get->the_phone);
        $sheet->setCellValue('G'.$x, $get->the_email);
      $x++;
    }

$filename = 'test';
$writer = new Xlsx($spreadsheet);
header('Content-Type: application/vnd.ms-excel');
header('Content-Disposition: attachment;filename="'. $filename .'.xlsx"');
header('Cache-Control: max-age=0');
$writer->save('php://output');
//End Function index
 }
//End Class Welcome
Conclusion
Here I explained how we can import a single excel/csv sheet to Drupal. Most of the third party system can have API ‘s which can place excel/csv data sheet in a directory in a regular interval of time. In that case, follow the same approach that I explained above and a create crone job to take the file from a specific location. So cron job will insert content from excel in regular intervals. This way you can automate the whole process.


")
Bình luận (0)
Add Comment