Khanh Hoang - Kenn
Kenn is a user experience designer and front end developer who enjoys creating beautiful and usable web and mobile experiences.
In Drupal 7 API there is a chapter dedicated to site theming. All elements of a site, without exclusion, should go through the theming process. But first of all theming itself should be set up. From a programmer's point of view, almost everything is done with the help of functions and there are many of them that facilitate theming in Drupal 7, too. The most important one is the theme() function. We'll look at 2 of them. They are:
Our tasks is as follows:
Task 1
Let's start with the theme_table().
Let's create a file of our module, which in our case will be table_page.module file. First of all we need to create a page where our table will be situated. In order to create a page we use hook_menu, in our case it will look the following way:
/**
 * Implements hook_menu().
 */
// function declaration
function table_page_menu() {
   // we create variable that indicates that page path will be «our_site/ table»,
   // our page has the following parameters
  $items['table'] = array(
     // page name
    'title' => t('Page with table'),
     // function that forms data for a table
    'page callback' => 'main_table',
     // access is true of course
    'access arguments' => array('TRUE'),
  );
  // let's not forget to return our variable
  return $items;
}

/**
 * Function main_table().
 */
// create function for data outlet for the created page
function main_table() {
  // we'll leave the page empty for now
  return '';
}
Now it's time to remember that a table in html is initiated with table tags, then the table lines are formed with the help of tr tag and later the cells are created, again with td tag. But it's not us who will have to form something, because function theme_table() will work with tags, and we'll set the function itself.
Every table must have a header. $header will consist of 1 row and 3 columns in the row.
That's how it should be done:
//we create a variable that contains an array
$header = array(
// now we create another array where data of first cell is situated
  array('data' => t('Header cell1')),
// second cell
  array('data' => t('Header cell2')),
// and third cell
  array('data' => t('Header cell3'))
);
Table header is created, now let's work with table body. We'll create 2 rows that will have 3 columns each.
// creating first row
$row [] = array(
  // output 1 cell in 1 row
  array('data' => t('Row 1 – Cell 1')),
  // second cell
  array('data' => t('Row 1 – Cell 2')),
  // third cell
  array('data' => t('Row 1 – Cell 3'))
);
//output of second row
$row [] = array(
  // cell 1
  array('data' => t('Row 2 – Cell 1')),
  // cell 2
  array('data' => t('Row 2 – Cell 2')),
  // cell 3
  array('data' => t('Row 2 – Cell 3'))
);
Now that we've completed the data input, we need to indicate the functons correctly. In our case the function has to contain the following type:
// we use theme function and  assign table parameter to it
theme('table',
           //creating array for data
           array(
             // value header will be in $header
             'header' => $header,
             // value rows will be taken out of $rows
             'rows'=> $rows
           )
);
Now we have the general view of our code as follows:
/**
 * Implements hook_menu().
 */
function table_page_menu() {
  $items['table'] = array(
    'title' => t('Page with table'),
    'page callback' => 'main_table',
    'access arguments' => array('TRUE'),
  );
  return $items;
}

/**
 * Function main_table().
 */
function main_table() {
  // creating value that contains array
  $header = array(
    // creating array that contains data from first cell
    array('data' => t('Header cell1')),
    // second cell
    array('data' => t('Header cell2')),
    // and third cell
    array('data' => t('Header cell3'))
  );
  // creating first row
  $rows[] = array(
    // output of first cell in 1 row
    array('data' => t('Row 1 – Cell 1')),
    // second cell
    array('data' => t('Row 1 – Cell 2')),
    // third cell
    array('data' => t('Row 1 – Cell 3'))
  );
  //second row output
  $rows[] = array(
    array('data' => t('Row 2 – Cell 1')),
    array('data' => t('Row 2 – Cell 2')),
    array('data' => t('Row 2 – Cell 3'))
  );

  return theme('table', array('header' => $header, 'rows'=> $rows));

}
The general view will be the following:
 và theme_fieldset() trong Drupal 7")
Task 2
Now let's output all nodes from the site in which the edit link will be placed. Our function will look the following way:
/**
 * Function main_table().
 */
//declare the function
function main_table() {
  // create $header, where an array indicating row is
  // cells have the following content
  $header_table_edit = array(
    // first cell has the following text 'Title'
    array('data' => t('Title')),
    // second cell has the following text 'Link to edit'
    array('data' => t('Link to edit'))
  );
  // make query to database where we choose numbers of nodes and the name from the table node
  $query = db_select('node', 'n')
    ->fields('n', array('nid', 'title'))
    ->execute()
    ->fetchAll();
  //output all our data from construction foreach
  foreach ($query as $record_edit_table) {
    //output a row that comtains
    $rows_table_edit[] =
      // celles      array(
        // in first cell there is an entry
        array(
          // there is link record of node name  in our cell
          // with the help of $record_table_edit -> title, link itself will look the following way
          // «'node/' . $record_table_edit -> nid» - i.e. we'll be redirected on the address like:
          // «our_site/node/'node number'»
          'data' => l($record_table_edit -> title, 'node/' . $record_table_edit -> nid)
        ),
        // second cell has link entry
        array(
           //link will have value 'edit node',
           //clicking on it we will be redirected on address like
           // «our_site / node / node_number/ edit»
          'data' => l(t('edit node'), 'node/'  . $record_table_edit -> nid  .  '/edit')
        )
    );
  }
  // create $caption with row value 'Table for edit nodes'
  $caption_table_edit = t('Table for edit nodes');
  // create function theme, that has value 'table' and outputs
  return theme('table',
      array(
               // table header is situated in $header_edit_table
              'header' => $header_table_edit,
              // table body is in $rows_edit_table
              'rows'     => $rows_table_edit,
              // table caption will be in $caption_edit_table
              'caption' => $caption_table_edit
            )
  );
}
After we launch script, we'll see the following:

The site has only 3 articles with titles being output and in the right column we see an active link for certain content editiing.
Then we'll сcreate an similar table with the only afjustment made for the link (right side column) to help activate the node deletion. That's how the code will eventually look like:
// all variables will have number 2 added into title
$header_table_delete = array(
    array('data' => t('Title')),
    array('data' => t('Link delete'))
  );
  foreach ($query as $record_table_delete) {
    $rows_table_delete[] =
      array(
        array(
          'data' => l($record_table_delete -> title,'node/' .$record_table_delete -> nid)
        ),
        array(
          // path to node deletion
          'data' => l(t('delete node'),'node/' .$record_table_delete -> nid . '/delete')
        )
    );
  }
  // table caption
  $caption_table_delete = t('Table for delete nodes');
  // we put node edi table in here
  $table_edit = theme('table',
    array('header'  => $header_table_edit,
          'rows'    => $rows_table_edit,
          'caption' => $caption_table_edit
          )
  );
  // in this variable we'll se a function that will
  $table_delete = theme('table',  form a table with a link to delete node
    array('header'  => $header_table_delete,
          'rows'    => $rows_table_delete,
          'caption' => $caption_table_delete
          )
  );
  // return table with edit links first($table_edit),
  // then output table with delete links ($table_delete).
  return "$table_edit" . "$table_delete";
The whole table will look the following way:

Task 3
In this assignment we will have to make 2 drop-down lists. A drop-down list is made with the help of such tags as fieldset, legend and special classes of CSS that form drop-down list. Let's look at script.
drupal_add_library('system', 'drupal.collapse');
this function is necessary because we upload library here that will turn on the class we are looking for.
// create variable for drop-down list
// to output information about node editting table
$edit_element = array(
                      // list title
                      '#title'          => t('Table for edit node'),
                      // content fieldset-а
                      '#children'    => t('This is main text in fieldset! Table contains link for edit node'),
                      // list of variable
                      '#collapsible' => true,
                      // and collapsed
                      '#collapsed'  => true,
                      // we indicate in attributes that specified classes must be used
                      '#attributes'  => array(
                                              'class' => array('collapsible', 'collapsed')
                                              ),
                      );
// input a function $fieldset_edit that will output field into
$fieldset_edit = theme('fieldset', array('element' => $edit_element));

// analogic to previous script
$delete_element = array(
                      '#title'       => t('Table for delete node'),
                      '#children'    => t('This is main text in fieldset! Table contains link for delete node'),
                      '#collapsible' => true,
                      '#collapsed'   => true,
                      '#attributes'  => array(
                                              'class' => array('collapsible', 'collapsed')
                                              ),
                      );
 $fieldset_delete = theme('fieldset', array('element' => $delete_element));
  // returning our data
  return "$fieldset_edit" . "$fieldset_delete ";
We'll see the following picture in the browser:

If we open lists, we'll see the following:

As you see, once it's finished and done the lists the process doesn't seem to be complicated. Now we get down to the last task.
Task 4
We need to put our newly created tables into the fieldset-lists. If you have handled all previous tasks, task 4 will nto be a problem. Let's look at the code that has to be changed.
$edit_element = array(
                      '#title'         => t('Table for edit node'),
                      // we add node edit table in here
                      '#children'    => t('This is main text in fieldset! Table contains link for edit node') . $edit_table,
                      '#collapsible' => true,
                      '#collapsed'   => true,
                      '#attributes'  => array(
                                              'class' => array('collapsible', 'collapsed')
                                              ),
                      );
$fieldset_edit = theme('fieldset', array('element' => $edit_element));

$delete_element = array(
                      '#title'           => t('Table for delete node'),
                       // here we add our node delete table
                      '#children'    => t('This is main text in fieldset! Table contains link for delete node') . $delete_table,
                      '#collapsible' => true,
                      '#collapsed'   => true,
                      '#attributes'  => array(
                                              'class' => array('collapsible', 'collapsed')
                                              ),
                      );
 $fieldset_delete = theme('fieldset', array('element' => $delete_element));
  // and we output only 2 fieldset-s
  return "$fieldset_edit" . "$fieldset_delete";
You can see the result on the next screen:


Kenn is a user experience designer and front end developer who enjoys creating beautiful and usable web and mobile experiences.
![]()


The Drupal Panels module is a powerful module for designing complex pages on your web site. In combination with CTools, Views, Page Manager, and Panelizer,
Over the last few months, we've been covering the Drupal community's progress towards releasing Drupal 8.
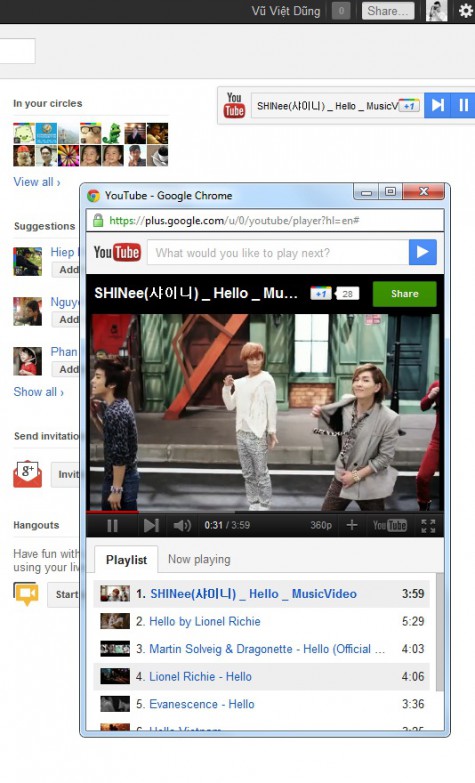
Google Plus đã tích hợp tính năng xem YouTube Video Playlist trực tiếp trên mạng xã hội này.


")


")


