Khanh Hoang - Kenn
Kenn is a user experience designer and front end developer who enjoys creating beautiful and usable web and mobile experiences.
Drupal 8 has a whole new configuration system that uses human-readable text files in the YAML (.yml) format to store configuration items. All of your site configuration from enabled modules through fields, contact categories to views are stored with this system. The system is designed to make it much easier than prior Drupal versions to export all your site configuration, make changes and import changes back in.
The Configuration Manager module in Drupal 8 provides a user interface for importing and exporting configuration changes between a Drupal installation in different environments, such as Development, Staging and Production, so you can make and verify your changes with a comfortable distance from your live environment.
This allows you to deploy a configuration from one environment to another, provided they are the same site. The site is identified using a Universally Unique Identifier (UUID) located in the system.site.yml file. The site UUID must match the target site to allow any importing of configuration files on that site.
This capability replaces the need for various contributed modules such as Features, Strongarm and Context.
Drupal 8 uses the YAML (.yml) human-readable text file format to store configuration. Default configuration shipped with modules, distributions and themes is stored with the projects themselves in a configsubdirectory. These default configurations are imported into the active configuration store when the respective projects are enabled. So the active configuration store is the complete set of live configuration at any given time.
The active configuration files can be found by default at sites/default/files/config_XXXX/active(where XXXXis a hash that look somewhat like iND62oxf-4DyUHcbCA7mhupb_KEpUaGZ6qcfTnAscNQ). There is also a staging directory on the same level, that Drupal uses to stage configuration changes. It will be empty by default and only populated when in the process of importing configuration.
An illustration of this process on your development site looks like the following:

During the installation Drupal writes the location of the (active & staging) configuration directories to the settings.phpfile.
<?php
$config_directories[#DD0000">'active'] = #DD0000">'sites/default/files/config_iND62oxf-4DyUHcbCA7mhupb_KEpUaGZ6qcfTnAscNQ/active';
$config_directories[#DD0000">'staging'] = #DD0000">'sites/default/files/config_iND62oxf-4DyUHcbCA7mhupb_KEpUaGZ6qcfTnAscNQ/staging';
?>
By default these folders are relative to the Drupal root installation folder.
You can override these locations in the same settings.phpfile.
<?php
$config_directories = array(
  CONFIG_ACTIVE_DIRECTORY => #DD0000">'/var/www/d8/config/active', #FF8000">// outside the webroot
  CONFIG_STAGING_DIRECTORY => #DD0000">'/var/www/d8/config/staging', #FF8000">// outside the webroot
);
?>
The configuration files are "hidden" by way of the random hash in the directory name and a .htaccessfile in the active and staging directories containing the directive Deny from allto stop your webserver from serving them. Moving the directories outside of the webserver root is possible for further security.
Making configuration changes on the live site is often not the best idea. The goal of the configuration system in Drupal 8 is to make taking a copy of the site configuration easy to set up a development site where you make changes. Then importing those changes on the live site is also made simple.
You can import, export, and synchronize configuration in your site via Manage > Configuration > Development > Configuration management (admin/config/development/configuration).
It is possible to export a single configuration file and paste it into another environment. The single import otion lets you specify the type of the configuration file and import it from your copy-pasted value.
The full export feature is a lot more powerful. You can download the an archive of all the active configuration files with this feature. This can be used to import on a development site (given the two sites are copies of each other) to import, synchronize, make changes, package up again and import and synchronize back on the live site as well.
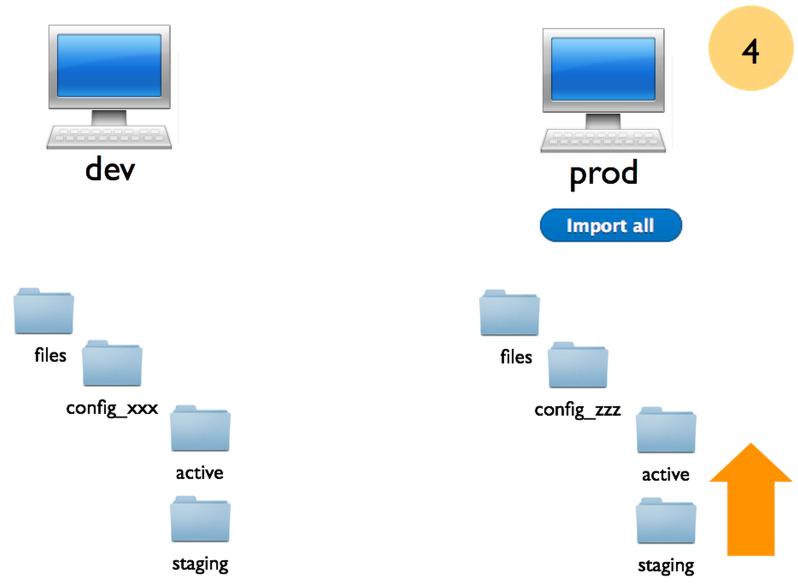
Assume you have identical dev and prod sites. Any changes made on the dev site will be saved into the active storage on the dev site. This can be exported and imported on the live site. The import will copy the YAML files into the staging directory.

Once you ran the import, you should synchronize your changes which will let you review all the changes between the prod active and staging directories.

From this list you can view the differences between each of the config files to ensure that the changes are as expected, before setting the changes active.
The Synchronize page will also show new or removed config files. It is important to check that there are no removals of any core config files (such as system.*, entity.*) as this will result in a site error.
Once the Synchronization is ran, the staging directory contents are now elevated to the live configuration, new modules are enabled, new fields, content types, etc. are added. In short all changes are live.

Here is a simple example that demonstrates how the site name can be configured in one environment and then deployed to another environment.
admin/config/system/site-informationadmin/config/development/configuration/full/export. This will create a compressed file.admin/config/development/configuration/full/importand upload the compressed file. After upload, review the changes and click Import allNow your site name is changed on the live site as well. Although theoretically you should make all changes on Development and deploy to Live, sometimes changes on Live directly may be necessary. To take those changes from the Live site to Development, do the following:
admin/config/development/configuration/full/export. This will create a compressed file.admin/config/development/configuration/full/importand upload the compressed file. After upload, review the changes and click Import allThis will update the Development site with any Live changes. From here, you can continue making further changes on Development and import back to Live when you are happy with the changes.
activefolder to the origin website's stagingfolder.stagingfolder to the destination's stagingfolderIf you're looking for more in-depth information about the Configuration Management system in Drupal 8, you can check the handbook pages for Configuration API.