Enterprise Website - Part 1
Welcome to our third and last recipe. This time we will elaborate on a Multilingual recipe for a complex Enterprise Website. We will have to, not only deal with localizing the site’s interface to the right language, but also translate new content, and deal with the whole process… from the conception of new content in its original language, to its live deployment in each supported language.
Our recepie will be inspired by a live website we developed for one of our clients: Hunter Industries. This is an enterprise class website, which has worldwide presence, and needs to support up to 24 languages. If you want to know more about the solution that we custom tailored for Hunter, don’t hesitate to visit the Hunter Drupal case study by following the hyperlink. Although Hunter is a good example, we will build a website from scratch, to talk about new exciting stuff, not available at the time we developed the Hunter site.
First things first: We need to start by doing the same steps we did in our first two recipes. If you haven’t read them yet, I invite you to do so by following these links: Recipe 1 and Recipe 2. In there you’ll learn some basic stuff, like adding the languages you’ll support, localizing the user interface to each supported language, and giving your users the possibility to pick the language of their choice. Once you’ve done this, we will be ready to roll up our sleeves and get our hands dirty.
By now you should have a website with the Locale and the Localization Update modules installed, enabled, and with some basic configuration. Users should be able to pick the language of their choice, and see the entire site’s interface in that selection they’ve made. You might also want to install the Localization Client module, in case your site’s interface is missing some translations, or they are not what you expect. Let’s do that real quick: Download and Install the module. If you’re in Drupal 7 (like we are), you should disable the Overlay (overlay module) for this to work properly. Once installed, the Localization Client module will show you a “translate text” bar on the bottom of the page.
Click on it and simply look for the text you want to fix or translate, and hit “Save translation”. You can also do that with the core Locale module, but this makes it a snap!.

Ok, we’re ready to actually translate some content. There’s two approaches for translating content: Translation Sets, and Field Based Translation.
Translation sets works around the idea of having a group of related nodes per language. So for instance, if you have an article node in English, then you will have copies of that article node, one for each enabled language; and hey will be all related in a “Translation Set”. Then you simply need to display the right copy of the node according to the target language.

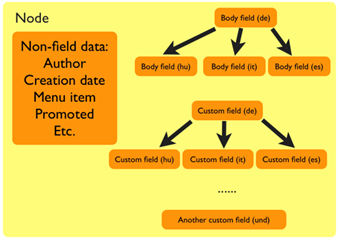
Field Based Translation on the other hand, works around the idea of taking translation to the field level. Instead of having copies of complete nodes per language, we now have one single node per language; with fields tha
t can be translated. So for instance, instead of having 5 or more copies of the same node article, we now have only one, and you simple go in and translate its title, or its body, or any other field it might have. This approach was introduced in Drupal 7 as a response to some limitations in Translation sets.


They both have pros and cons, but we will focus on Field Based Translation since the bulk of the development trends are going towards that direction; and there are plans to
move it into Drupal 8 core. Plus a new redesigned UI for translating text introduced in this approach makes the task of translating content super easy and intuitive. The module that adds field based translation support is called Entity Translation. Let’s go ahead and install it. We will also need to install the Title module, since title is not a field in Drupal 7 anymore. Go ahead and install that too.
Once you’ve installed them, we need just few more clicks to make our content translatable. Navigate to Administration > Structure > Content types and pick the content type that needs content translation support. Edit the Content type, click on the Publishing options, and select the “Enabled, with field translation” option, then hit save.
Next, we need to turn the Title of our content type into a field. Click on the Manage Fields tab, and click on the “replace” link that appears on the Title row field.
Finally, we need to make all of the fields in our content type translatable. For this, edit each field in our content type, scroll down to the bottom and make sure to enable translation in each field. You can also do this for the fields, adding translation support for files such as images, word docs, pdf, spreadsheets, videos, etc.


That should be more than enough information to digest for now. The final part of the Translation process will conclude in the coming weeks and you should have a fully functional multilingual enterprise site.


-255x180.png)


