
Khanh Hoang - Kenn
Kenn is a user experience designer and front end developer who enjoys creating beautiful and usable web and mobile experiences.
Organic Groups (OG) is the social networking solution for Drupal. It forms the basis of http://groups.drupal.org and also powers Drupal Commons, the widely used social networking distribution.
OG allows users to create and manage their own groups. Other members can then join those groups and share content either privately or publicly.
Two notes of caution before we start:
OG is a powerful solution but not for the faint of heart. To use it, you will need a good understanding of Drupal, plus Views and Panels as well.
There are some major differences between the Drupal 6 version and the new Drupal version.
Here's an introduction to OG for Drupal 7. Click here for our tutorial on Organic Groups for Drupal 6.

You'll need to download and install these four modules:
Organic Groups: http://drupal.org/project/og
Entity API: http://drupal.org/project/entity
Chaos tool suite: http://drupal.org/project/ctools
Features: http://drupal.org/project/features
Organic Groups won't work without those modules, but to make use of OG you'll certainly need these modules too:
Panels: http://drupal.org/project/panels
When you visit the modules page to enable modules, make sure to enable all of the Organic group submodules.
After enabling the modules, you'll see a message saying "The content access permissions need to be rebuilt." Click "Rebuild permissions" and follow through the steps until the process is finished.

Here's the key thing to understand about Organic Groups: they are entirely based on Drupal's nodes.
The groups themselves are nodes and the content shared inside the groups are nodes. When you set up a new content type, you can decide whether nodes in that content type become groups or content within groups.
In this example we're going to build a social networking site for a school. We're going to allow parents and helpers to organize into groups.
Go to Structure > Content types > Add content type.
We're going to create a type of group called a "Volunteer Team".

Each node created using this content type will be a new group because we selected "Group type" in the options at the bottom of the page.
We also decided that this is "not a group content type".

Now let's create a group. Go to Add content > Volunteer team and create a new node.
Make sure to check the box Group to ensure that this node will form the basis of a new group.

The resulting node will look just like a normal content item. The one exception will be the Group tab.

Click the Group tab and you'll see a pop-up window. This allows you to control the members of the group.

Now let's create some content for our groups.
Go to Structure > Content types > Add content type.
We're going to create a type of content called "Events for Volunteer Teams".

Select "Not a group type".
Select "Group content type".

Save your new content type.
Go to Add content and select Events for Volunteer Teams.
Create a specific new event for one your volunteer team.

As before, your event will look like a normal content item. The only slight difference is that your asssociated group will be listed.

Currently we have no real information or layout for any of our group pages. We need to use Views and then Panels before our social networking site will take shape.
Go to Structure > Views and you'll see that four different views are already in place. These views will form the building blocks of your group pages.
OG content: this will show all of the content posted to a particular group.
OG list: this will list all of the available groups on your site.
OG members: this will show the new members of a group.
OG User groups: this will show a user which groups they have joined.

You can click on the paths for OG list and OG User groups to get an idea of what they'll look like.

Now that we have our content and views, we can put them together using Panels.
Go to Structure > Panels.
Click Enable and then Edit next to Node template.

Click Add a new variant.

Enter a Title for your Panel.
Check the Selection rules box.

Select OG: Node is an OG group.
Click Add and then click Save.

Click Continue.
Choose a layout for your groups page.
Click Continue.

Click Continue and then click Continue to skip the next page.
Click on any of the cogs next to one of the regions:

You can choose to place some of the different node elements on the page.

You can also take some of the Views that we saw earlier and place those into different regions.

Click Create Variant (do not click Save at this point. If you do, you'll lose your work).
Click Update and Save.
Go to visit one of your groups and you'll see that groups pages are starting to take shape.

From this point onwards, there is still a lot of work to do in order to create a social site, but hopefully the principles are now clear. The process of getting OG setup is Content > Views > Panels.

Kenn is a user experience designer and front end developer who enjoys creating beautiful and usable web and mobile experiences.
![]()


Learn how you can leverage Grunt and LibSass as groundwork to improve your Frontend Development process
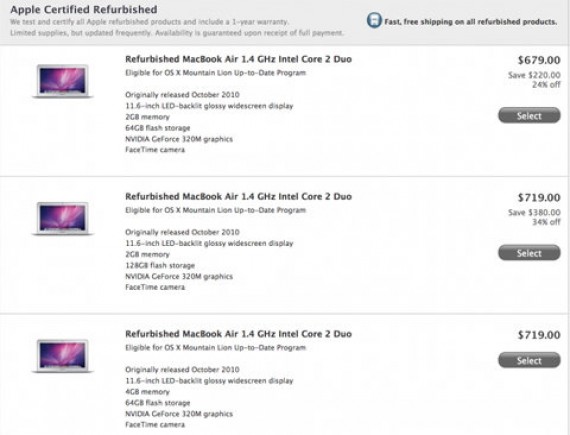
Các mẫu laptop siêu mỏng của Apple thế hệ ra mắt năm 2010 được bán dưới dạng hàng tân trang lại (refurbished) có cấu hình khá với chip Core 2 Duo, RAM tối đa 4 GB và ổ cứng tối đa 128 GB.
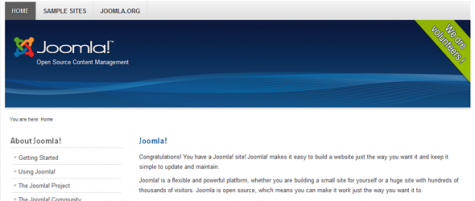
Bạn muốn khởi nghiệp blogger chuyên nghiệp bằng một website bóng bẩy và đầy đủ chức năng? WordPress, Joomla, Drupal và nhiều CMS khác có thể giúp bạn.


")


