This post is part 3 in the series “Hashing out a docker workflow”. For background, checkout my previous posts.
>> Acquia certification program có thật sự cần cho drupal Dev
>> Hướng dẫn Solr Integrations với Drupal Sarnia Module
>> Hướng dẫn làm Integrate Drupal và Shopify
Now that I’ve laid the ground work for the approach that I want to take with local environment development with Docker, it’s time to explore how to make the local environment “workable”. In this post we will we will build on top of what we did in my last post, Docker and Vagrant, and create a working local copy that automatically updates the code inside the container running Drupal.
Requirements of a local dev environment
Before we get started, it is always a good idea to define what we expect to get out of our local development environment and define some requirements. You can define these requirements however you like, but since ActiveLAMP is an agile shop, I’ll define our requirements as users stories.
User Stories
As a developer, I want my local development environment setup to be easy and automatic, so that I don’t have to spend the entire day following a list of instructions. The fewer the commands, the better.
As a developer, my local development environment should run the same exact OS configuration as stage and prod environments, so that we don’t run into “works on my machine” scenario’s.
As a developer, I want the ability to log into the local dev server / container, so that I can debug things if necessary.
As a developer, I want to work on files local to my host filesystem, so that the IDE I am working in is as fast as possible.
As a developer, I want the files that I change on my localhost to automatically sync to the guest filesystem that is running my development environment, so that I do not have to manually push or pull files to the local server.
Now that we know what done looks like, let’s start fulfilling these user stories.
Things we get for free with Vagrant
We have all worked on projects that have a README file with a long list of steps just to setup a working local copy. To fulfill the first user story, we need to encapsulate all steps, as much as possible, into one command:
We got a good start on our one command setup in my last blog post. If you haven’t read that post yet, go check it out now. We are going to be building on that in this post. My last post essentially resolves the first three stories in our user story list. This is the essence of using Vagrant, to aid in setting up virtual environments with very little effort, and dispose them when no longer needed with vagrant up and vagrant destroy, respectively.
Since we will be defining Docker images and/or using existing docker containers from DockerHub, user story #2 is fulfilled as well.
For user story #3, it’s not as straight forward to log into your docker host. Typically with vagrant you would type vagrant ssh to get into the virtual machine, but since our host machine’s Vagrantfile is in a subdirectory called/host, you have to change directory into that directory first.
Another way you can do this is by using the vagrant global-statuscommand. You can execute that command from anywhere and it will provide a list of all known virtual machines with a short hash in the first column. To ssh into any of these machines just type:
$ vagrant ssh <short-hash>
Replace <short-hash> with the actual hash of the machine.
Connecting into a container
Most containers run a single process and may not have an SSH daemon running. You can use the docker attach command to connect to any running container, but beware if you didn’t start the container with a STDIN and STDOUT you won’t get very far.
Another option you have for connecting is using docker exec to start an interactive process inside the container. For example, to connect to the drupal-container that we created in my last post, you can start an interactive shell using the following command:
$ sudo docker exec -t -i drupal-container /bin/bash
This will return an interactive shell on the drupal-container that you will be able to poke around on. Once you disconnect from that shell, the process will end inside the container.
Getting files from host to app container
Our next two user stories have to do with working on files native to the localhost. When developing our application, we don’t want to bake the source code into a docker image. Code is always changing and we don’t want to rebuild the image every time we make a change during the development process. For production, we do want to bake the source code into the image, to achieve the immutable server pattern. However in development, we need a way to share files between our host development machine and the container running the code.
We’ve probably tried every approach available to us when it comes to working on shared files with vagrant. Virtualbox shared files is just way too slow. NFS shared files was a little bit faster, but still really slow. We’ve used sshfs to connect the remote filesystem directly to the localhost, which created a huge performance increase in terms of how the app responded, but was a pain in the neck in terms of how we used VCS as well as it caused performance issues with the IDE. PHPStorm had to index files over a network connection, albiet a local network connection, but still noticebly slower when working on large codebases like Drupal.
The solution that we use to date is rsync, specifically vagrant-gatling-rsync. You can checkout the vagrant gatling rsync plugin on github, or just install it by typing:
$ vagrant plugin install vagrant-gatling-rsync
Syncing files from host to container
To achieve getting files from our localhost to the container we must first get our working files to the docker host. Using the host Vagrantfile that we built in my last blog post, this can be achieved by adding one line:
config.vm.synced_folder '../drupal/profiles/myprofile', '/srv/myprofile', type: 'rsync'
Your Vagrantfile within the /host directory should now look like this:
# -*- mode: ruby -*-
# vi: set ft=ruby :

Vagrant.configure(2) do |config|
  config.vm.box = "ubuntu/trusty64"
  config.vm.hostname = "docker-host"
  config.vm.provision "docker"
  config.vm.network :forwarded_port, guest: 80, host: 4567
  config.vm.synced_folder '../drupal/profiles/myprofile', '/srv/myprofile', type: 'rsync'
end
We are syncing a drupal profile from a within the drupal directory off of the project root to a the /srv/myprofile directory within the docker host.
Now it’s time to add an argument to run when docker run is executed by Vagrant. To do this we can specify the create_args parameter in the container Vagrant file. Add the following line into the container Vagrantfile:
docker.create_args = ['--volume="/srv/myprofile:/var/www/html/profiles/myprofile"']
This file should now look like:
# -*- mode: ruby -*-
# vi: set ft=ruby :

Vagrant.configure(2) do |config|
  config.vm.provider "docker" do |docker|
    docker.vagrant_vagrantfile = "host/Vagrantfile"
    docker.image = "drupal"
    docker.create_args = ['--volume="/srv/myprofile:/var/www/html/profiles/myprofile"']
    docker.ports = ['80:80']
    docker.name = 'drupal-container'
  end
end
This parameter that we are passing maps the directory we are rsyncing to on the docker host to the profiles directory within the Drupal installation that was included in the Drupal docker image from DockerHub.
Create the installation profile
This blog post doesn’t intend to go into how to create a Drupal install profile, but if you aren’t using profiles for building Drupal sites, you should definitely have a look. If you have questions regarding why using Drupal profiles are a good idea, leave a comment.
Lets create our simple profile. Drupal requires two files to create a profile. From the project root, type the following:
$ mkdir -p drupal/profiles/myprofile
$ touch drupal/profiles/myprofile/{myprofile.info,myprofile.profile}
Now edit each file that you just created with the minimum information that you need.
myprofile.info
name = Custom Profile
description = My custom profile
core = 7.x
myprofile.profile
<?php
function myprofile_install_tasks() {
  // Add tasks here.
}
Start everything up
We now have everything we need in place to just type vagrant up and also have a working copy. Go to the project root and run:
This will build your docker host as well as create your drupal container. As I mentioned in a previous post, starting up the container sometimes requires me to run vagrant up a second time. I’m still not sure what’s going on there.
After everything is up and running, you will want to run the rsync-auto command for the docker host, so that any changes you make locally traverses down to the docker host and then to the container. The easiest way to do this is:
$ cd host
$ vagrant gatling-rsync-auto
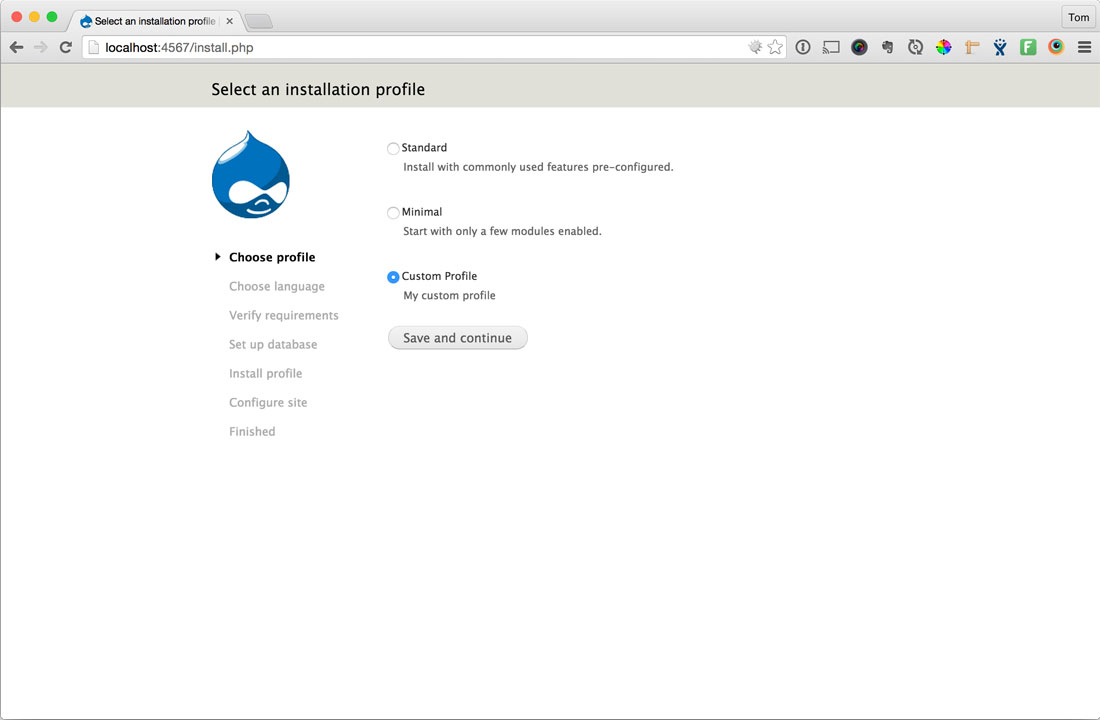
Now visit the URL to your running container at http://localhost:4567 and you should see the new profile that you’ve added.

Conclusion
We covered a lot of ground in this blog post. We were able to accomplish all of the stated requirements above with just a little tweaking of a couple Vagrantfiles. We now have files that are shared from the host machine all the way down to the container that our app is run on, utilizing features built into Vagrant and Docker. Any files we change in our installation profile on our host immediately syncs to the drupal-container on the docker host.
At ActiveLAMP, we use a much more robust approach to build out installation profiles, utilizing Drush Make, which is out of scope for this post. This blog post simply lays out the general idea of how to accomplish getting a working copy of your code downstream using Vagrant and Docker.
In my next post, I’ll continue to build on what I did here today, and introduce automation to automatically bake a Docker image with our source code baked in, utilizing Jenkins. This will allow us to release any number of containers easily to scale our app out as needed.


