Bảo vệ Drupal Content với Node Access Password

Bảo vệ Drupal Content với Node Access Password

Node Access Password is a module that allows you to password-protect your Drupal content.

This module will automatically generate a random password for each node you want to protect. That password must be entered before viewing the content.

We're going use the example of a real estate website. We're going to set up a Property Manager who can give access to individual properties by handing out passwords.

The Property Manager case will be able to view the passwords created and give those passwords out.

Step 1. Install the four required modules

tutuploadsmedia_1333427701451.png

Node Access Password is a single module, but it won't operate without three dependencies. You will need to install and enable all of these modules:

Step 2. Enable all the modules

tutuploadsmedia_1333427877798.png

  • Return to the Module page and check the boxes next to the modules.
  • Scroll to the bottom of the page and save.
  • Double check that all are checked. You can't activate a module until it's dependencies are activated, so you can't always activate everything at once.

Step 3. Add a new role

tutuploadsmedia_1333429681369.png

  • Go to People > Permissions > Roles. We're going to create the role for the Property Manager.

tutuploadsmedia_1333429705176.png

  • Type in the name of the role.
  • Click Add role.
  • Click Save order.

Step 4. Edit role permissions

tutuploadsmedia_1333429924289.png

  • Click edit permissions after the role is added and saved.

A quick reminder about permissions: Permissions let you control what users can do and see on your site. You can define a specific set of permissions for each role. Two important roles to consider are Authenticated Users and Administrators. Any permissions granted to the Authenticated Users role will be given to any user who can log into your site. You can make any role the Administrator role for the site, meaning this will be granted all new permissions automatically. You can do this on the User Settings page. You should be careful to ensure that only trusted users are given this access and level of control over your site.

tutuploadsmedia_1333432388947.png

  • Grant permissions for Content Access.

tutuploadsmedia_1333432533136.png

  • Grant permissions for any content types you want the property manager to have access to. There may be more than one type.
  • Double check the entire permissions list for permissions you should grant. Other modules you have installed may need attention.
  • You won't see the "Property" type until you've created it. We'll create that in the next step.
  • You will need to return to the role permissions after the content types are set up.

Step 5. Create a Content type Called Property

tutuploadsmedia_1333430406584.png

  • Go to Structure > Content types.
  • Create a content type called Property.

Step 6. Add the Password Field to Property

tutuploadsmedia_1333439932695.png

  • Go to Structure > Content types > click manage fields next to Property.
  • Choose Node access password as the Type of data to store.
  • Make sure the widget is also Node access password.

Step 7. Define per content access control

tutuploadsmedia_1333430672359.png

  • After creating the field, you will now see an Access Control tab.
  • Give the Property Manager the access you want that role to have.
tutuploadsmedia_1333430819679.png
  • Go through each section of the content control and create the formula that is going to work for you. You may want to adjust the anonymous and authenticated user access. Trial and error after you've got it all working is the best method.
  • Be sure to check "Enable per content node access control settings."
  • Optionally you can enable per content node access control settings. If enabled, a new tab for the content access settings appears when viewing content. You have to configure permission to access these settings at the permissions page.

Step 8. Create the content

tutuploadsmedia_1333431354389.png

  • Go to Add content > Property.
  • Check the box next to the password field you created. Your field label may be different than mine.
  • Save and publish your entry.

tutuploadsmedia_1333440936693.png

  • The password will be generated and visible on the View tab when you are logged in with the proper permissions.
  • You can give this password out to your users.

Step 9. The Access control Tab

tutuploadsmedia_1333433527303.png

  • After creating the node, you will see an additional tab called Access control.
  • Click the Access control tab to view the password or to create new access rules.

Step 10. Give Selected Users a Link to the Content

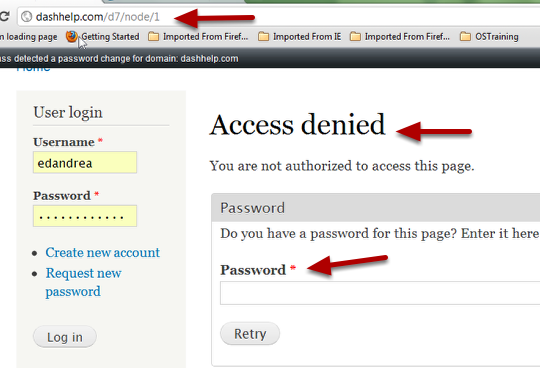
Bảo vệ Drupal Content với Node Access Password

  • You can create a menu item or you can simply give them a link directly to the page.
  • In the example above I went directly to the page via the URL. If I try to view the content directly, I get the message "Access is denied".
  • There is a password prompt which I will have to deal with before I can see the content.

via ostraining

Bạn thấy bài viết này như thế nào?: 
No votes yet
Ảnh của Khanh Hoang

Khanh Hoang - Kenn

Kenn is a user experience designer and front end developer who enjoys creating beautiful and usable web and mobile experiences.

Tìm kiếm bất động sản


Advertisement


jobsora

Dich vu khu trung tphcm

Dich vu diet chuot tphcm

Dich vu diet con trung

Quảng Cáo Bài Viết

 
Hãy xây dựng “Domain Authority”, đừng chú tâm xây dựng Link

Hãy xây dựng “Domain Authority”, đừng chú tâm xây dựng Link

Xây dựng liên kết (Link Building) là một quá trình không thể thiếu cho một chiến dịch SEO và điều này không thể thay đổi trong một sớm một chiều. Những liên kết này là chìa khóa rất quan trọng để Google đánh giá độ phổ biến và chất lượng của website. Chính vì thế, nói một cách đơn giản : “Bạn cần Links”.

Giới thiệu các lệnh command line hữu ích trong Window 8 năm 2015

Giới thiệu các lệnh command line hữu ích trong Window 8 năm 2015

Ở trên, bạn đã có thể chạy được Microsoft Excel , Microsoft Access, Microsoft Powerpoint, Microsoft Word, Microsoft Frontpage

Hướng dẫn mở rộng để thêm field vào entity / node display trong Drupal 7

I had a case recently, where I needed to add custom data to the node display and wanted this data to behave like a field, however the data itself didn't belong to a field.

Công ty diệt chuột T&C


Diet con trung