Tác giả: Nguyễn Anh Khoa
Mục đích: nội dung của chủ đề này giúp chúng ta sẽ cấu hình Axis2 trong Eclipse.
Để thực hiện được phần này bạn cần download:
1.Config server Tomcat trong Eclipse
Gỉải nén gói Eclipse và Tomcat vừa download.
Chạy Eclipse.
Chọn Window -> Preferences

Chọn Server -> Runtime Environment. Click Add
Chọn Apache -> Apache Tomcat v6.0
Check Create new local server. Click Next
Click Browse.
Chọn đến folder Apache Tomcat sau khi giải nén.
Click OK -> Finish
Check server vừa config
Trong cửa sổ Server:
Nếu không thấy cửa sổ Server, chọn Window -> Show View -> Other -> Server -> Servers.
Click OK.
Start server.
Đến đây server đã được add trong Eclipse thành công.
Mở Intenet Browser và gõ vào địa chỉ http://localhost:8080
Trang start page của tomcat.
Bạn có thể gặp lỗi sau:
Lỗi này hiện tại mình vẫn chưa biết cách fix nhưng server vẫn start thành công và mình vẫn deploy và run các project bình thường.
Nếu muốn đổi port cho Tomcat, có thể dùng 2 cách sau:
1. Mở file ~\apache-tomcat-6.0.26\conf\server.xml
Tìm đến dòng sau đây và đổi giá trị của port.
Stop server, delete server trong cửa sổ Servers trước rồi remove trong Preference.
Add server lại theo các bước như trên.
2. Đổi giá trị của port tại dòng
trong 2 file:
- ~\workspace\.metadata\.plugins\org.eclipse.wst.server.core\tmp0\conf\server.xml: Đây là file config server riêng của Eclipse. Khi server mới được add trong cửa sổ Servers thì các file config của server sẽ được copy vào trong thư mục này.
- File server.xml trong cửa sổ Project Explorer:
Restart server.
2.Config Axis2 in Eclipse
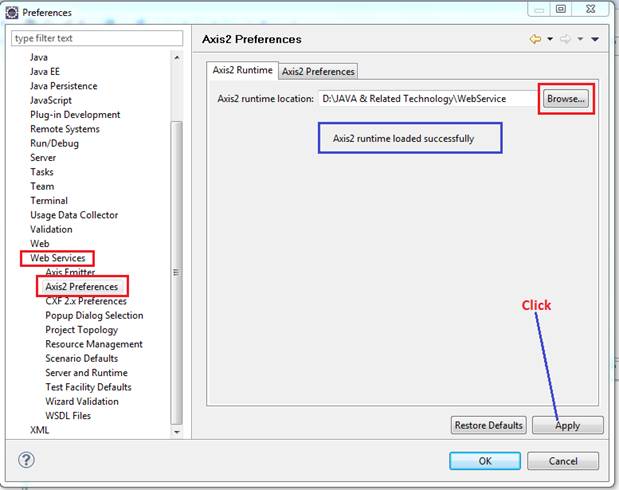
Chọn Window -> Preferences -> Web Services -> Axis2 Preferences. Click Browse
Chọn đến folder chứa gói war của Axis2.
Nếu hiển thị thông báo Axis2 runtime loaded successfully là bạn đã chọn đúng folder.
Click Apply.
Chọn Server and Runtime trong mục Web Services.
Web service runtime chọn Apache Axis2. Click OK.
Đến đây mình đã config xong Axis2 trong Eclipse.
Mình không test được Axis2 trong Eclipse như NetBean vì khi tạo Web Service tool mới add Axis2 trong project. Rồi khi deploy project thì Axis2 mới được deploy theo.
Chúng ta sẽ tạo 1 Web Service trong bài tiếp theo.


 = x^2 + x^4 + … + x^2n")


")
