Search facets and filtering are a great way to guide your user to the information they are looking for. With facets, we can create an intuitive way for users to narrow down the items that are visible on the screen. Drupal’s core search capability does not provide a way to implement facets, so we need to look at contributed modules to achieve this. In Drupal 6, we would reach for the Apache Solr Search module. This is a great, high performance solution, but it has it’s drawbacks. Installing Solr on your web server can be tricky, and with most shared hosting accounts not even permitted. Fortunately, with Drupal 7 and a few API modules, we can incorporate these wonderful little facets without the need for a full-blown Solr setup.
As an example, we are going to walk through creating a photo gallery using Views. We will then use the powerful combination of the Search API, Entity API and Facet API to allow users to filter the photos using 2 facet blocks.
CREATE THE CONTENT TYPE AND TEST DATA
First, let’s start by creating our content type, called Photo, with the following fields:
-
Title
-
Photo – Image
-
Location – List (text)
-
Type – List (text)
Make sure to populate your Location and Type lists with some values. Next, we need to generate test data using Devel Generate content. I created 50 Photo nodes, but feel free to create a different amount if you prefer.
DOWNLOAD THE API MODULES
Download the Search API, Entity API, Facet API and Database search modules to your modules directory. Now, visit the Modules admin page (/admin/modules) and enable the following modules:
CONFIGURE THE SEARCH SERVER
Let’s go to the Configuration admin page (/admin/config) and click on the Search API link. You should now be on the Search API configuration page:

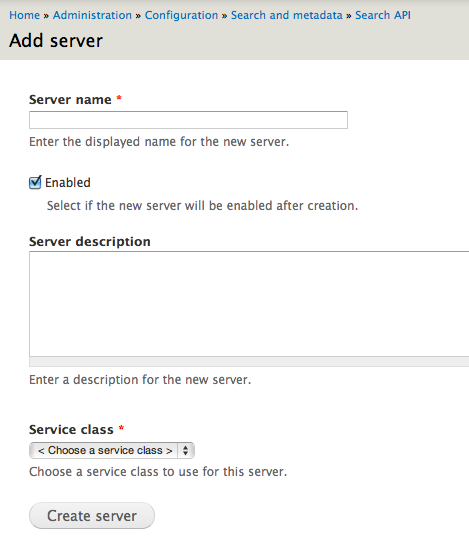
Click on the Add server link and you will see this form:

Choose a name for your server (I chose MySQL) and select Database service for the Service class field. Click the Create server button, and you will see the following:

CONFIGURE THE SEARCH INDEX
Now, click back to the Search API config page, and click the Add index link. You will see the following:

Use the following values:
-
Index name: GalleryIndex
-
Item type: Node
-
Server: MySQL
-
Index items immediately: checked
Now, click the Create index button. We are now faced with a rather large form that will allow us to select which fields we would like to index and make available to Views. We are going to check the following:
-
Content type
-
Location
-
Type
Now, click the Save configuration button.
We now need to select the indexed items that we would like to have facets for. Click on the Facets tab and you will see the indexed items we chose. It is recommended for performance reasons to only choose the facets that are needed, so let’s select Location and Type. Click on the Save configuration button when you are done.
DON’T FORGET TO RUN CRON!
We must run cron at this point to populate the search index.
CREATE THE VIEW

Let’s go to the Structure » Views page and click on Add new view link. Use the following values:
-
View name: Gallery
-
Show: GalleryIndex (this corresponds to the name of the search index we created earlier)
-
Create a page: checked
-
Path: gallery
-
Display format: Grid
Now, click the Continue & edit button.
TWEAK THE VIEW
The View setup is pretty straight ahead. We need to add a filter criteria for the Photo Content type. Notice that it is labeled Indexed Node: Content type. Once we do that, we just need to remove the existing Node ID field and add the Indexed Node: Photo field. Now, save your view.
PLACE THE FACET BLOCKS
Go to the Structure » Blocks page (/admin/structure/block) and you should see the facet blocks for Location and Type in the listing. All we need to do is put them in the region in which we want them to appear. In my case I selected Sidebar Second.
SUCCESS!
Now, visit the Gallery page (/gallery) and you should see something similar to this:


