Khanh Hoang - Kenn
Kenn is a user experience designer and front end developer who enjoys creating beautiful and usable web and mobile experiences.
Configuring Views and Date is a simple enough task for any reasonably experienced site builder, but I’ve found that configuring Views to correctly handle and display repeating events is another matter. To get us started, I’ve installed the following modules:
- Date Date Repeat Field, Date Views
I created a content type called “Event”. The next step is to add and configure a Date field. While configuring, make sure you set “Repeating Date” to “Yes”.

The rest of the settings are more or less up to you depending on your needs, but if you’re not sure, the defaults should be fine. You’ll notice that the “Number of Values” setting is grayed out. This is because repeating Date fields required Unlimited values.

Now that your Date field has been configured, create a piece of test content. This will come in handy while you’re building your View. Any sort of repeating event will do. For this example, I’ll be using an event that repeats on the second Thursday of each month for the next three years.

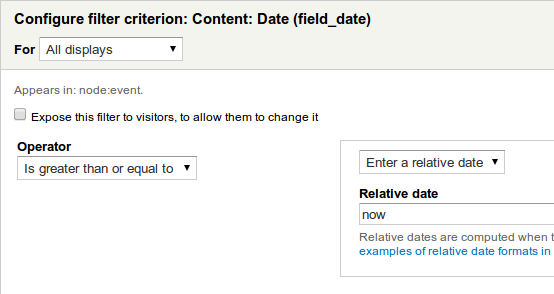
Now that we have some content to work with, we can create our view. This view will have one Page type display, showing content of the Event type as an unformatted list of fields. Generally, the first thing you will want to do is add a filter to the view to prevent it from showing past events. If you do want past events to be shown, skip this section, otherwise, add a new filter for the Date field on your Event content type. If you chose to use a Date field with both a Start and End date, you’ll want to select the Start date for the filter.

Generally, I prefer Minute granularity, and you must select “Yes” for “Add multiple value identifier”. Next, set the filter itself to “greater than or equal to” and a relative time of “now”.

Now your view will only display current and future events. With the addition of this filter, the single event in your preview should have changed to multiple events. The next step: adding and configuring the Date field itself.
The settings for the Date field are fairly simple. In most cases, you’ll want to hide the repeat rule. However, you must uncheck “Display all values in same row” under “Multiple field settings”, or the view will not correctly display the dates.

The resulting view should be a perfectly serviceable list of your upcoming events. However, there is one optional extra step: for a given event, only displaying the next occurrence, not any past occurrences or more than one future occurrence. To do this, you’ll need to enable two settings under the Advanced tab on the right. The first is Aggregate, which is under the “Use aggregation” option.

The second option we need to enable is Distinct, which is under the “Query settings” option:

This, combined with the filter we made earlier, will cause your view to display only the next upcoming event for a recurring event series. And with that, you’re done: your view now displays recurring date fields correctly.
Bình luận (0)
Add Comment