Do you want to make it easier for editors to insert a block of HTML by just including a short token? Maybe you want to add some custom Javascript or CSS, but only for content that contains a certain pattern. Or, maybe you want to filter out certain words that site visitors will find offensive.
In this article, we will create a custom filter for Drupal 8, one that replaces a pattern and adds the required CSS to the page. We’ll also add an option for the filter that users can toggle.
What are Drupal Filters and Text Formats?
Drupal allows you to create text formats, which are groupings of filters. Filters can serve several purposes, but one of the main use cases is to limit what HTML can be placed into content. This helps keeps the site more secure, and prevents editors from potentially breaking the layout.
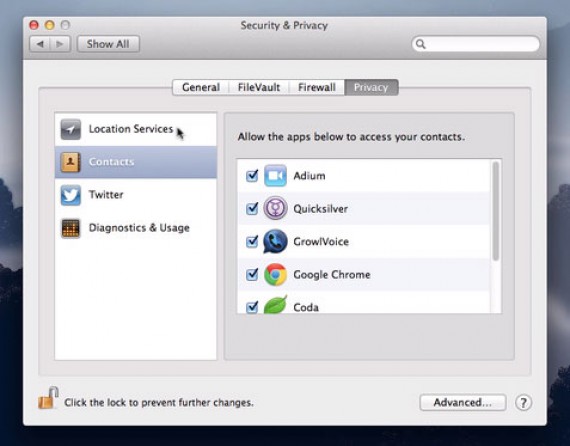
One of the default text formats is “Basic HTML.” When you configure this format by going to admin/config/content/formats/manage/basic_html and scrolling down a bit, you can see all of the enabled filters for it.
Each filter can have optional settings. For example, you can view the options form for the “Limit allowed HTML tags” filter by scrolling down a bit more.
How do you create your own filters to enable on text formats, and how do you make them configurable?
Frame out the Module
First we create a ‘celebrate’ module folder and then our celebrate.info.yml file.
name: Celebrate
description: Custom filter to replace a celebrate token.
type: module
package: custom
core: 8.x
A custom filter is a type of plugin, so we will need to create the proper folder structure to adhere to PSR-4 standards. Our folder structure will be celebrate/src/Plugin/Filter.
In the Filter folder, create a file named FilterCelebrate.php. Add the proper namespace for our file and pull in the FilterBase class so we can extend it.
Our file looks like this so far:
namespace Drupal\celebrate\Plugin\Filter;

use Drupal\filter\Plugin\FilterBase;

class FilterCelebrate extends FilterBase {

}
FilterBase is an abstract class that implements the FilterInterface, taking care of most of the mundane setup and configuration. The only function we are required to implement in our own filter class is process(). According to the FilterInterface::process documentation, the function must return the filtered text, wrapped in a FilterProcessResult object. This means we need to put another use statement in our file.
This may seem onerous. Why can’t we just return the text itself? Why do we need another object? This will become clear later, when we need to add some more advanced use cases. There are good reasons for it. For now, to prevent our IDE or code editor from yelling at us, we’ll put a passthrough function as a placeholder, which does no transformations on the text.
Here is our updated code:
namespace Drupal\celebrate\Plugin\Filter;

use Drupal\filter\FilterProcessResult;
use Drupal\filter\Plugin\FilterBase;

class FilterCelebrate extends FilterBase {

  public function process($text, $langcode) {
    return new FilterProcessResult($text);
  }
}
Get Drupal to Discover our Filter
Since a filter type is a plugin, Drupal needs us to add an annotation to our class so it knows exactly what its needs to do with our code. Annotations are comments placed before the class definition, arranged in a certain format.
The file, with our annotation, will look like this:
namespace Drupal\celebrate\Plugin\Filter;

use Drupal\filter\FilterProcessResult;
use Drupal\filter\Plugin\FilterBase;

/**
 * @Filter(
 *   id = "filter_celebrate",
 *   title = @Translation("Celebrate Filter"),
 *   description = @Translation("Help this text format celebrate good times!"),
 *   type = Drupal\filter\Plugin\FilterInterface::TYPE_MARKUP_LANGUAGE,
 * )
 */
class FilterCelebrate extends FilterBase {
  public function process($text, $langcode) {
    return new FilterProcessResult($text);
  }
}
Every plugin declaration needs an id, so we give it a reasonable one. Title and description are what will be shown on the admin screens. After we enable the module, you should see something like this on the screen for a text format:
The “type” in the annotation needs a bit more of an explanation. This is a classification for the purpose of the filter, and there are a few constants that help us populate the property. From the documentation, we have the following options:
FilterInterface::TYPE_HTML_RESTRICTOR: HTML tag and attribute restricting filters.
FilterInterface::TYPE_MARKUP_LANGUAGE: Non-HTML markup language filters that generate HTML.
For our purposes, we plan on taking a bit of non-HTML markup and turning it into HTML, so the second classification fits.
There are a few more optional properties for Filter annotations, and they can be found in theFilterInterface documentation.
Adding Basic Text Processing
For this filter, we want to replace every instance of the token “[celebrate]” with the HTML snippet “<span class=”celebrate-filter”>Good Times!</span>”. To do that, we add some code to our FilterCelebrate::process function.
  public function process($text, $langcode) {
    $replace = '<span class="celebrate-filter">’ . $this->t(‘Good Times!’) . ‘</span>';
    $new_text = str_replace('[celebrate]', $replace, $text);
    return new FilterProcessResult($new_text);
  }
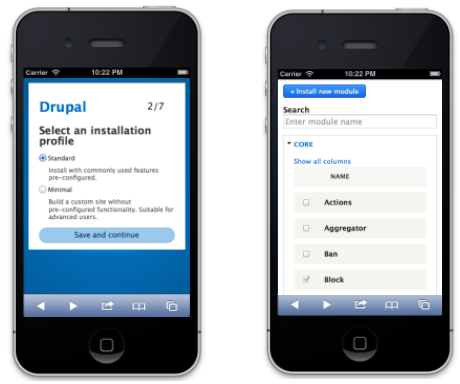
Enable the Celebrate filter for the Basic HTML content filter, and create some test content that contains the [celebrate] token. You should see it replaced by the HTML snippet defined above. If not, check to make sure the field has the Basic HTML filter applied.
Adding a Settings Form for the Filter
But we want the user to be able to toggle an option regarding this filter. To do that, we need to define a settings form by overriding the settingsForm() method for our class.
We add the following code to our class to define a form array for our filter:
  public function settingsForm(array $form, FormStateInterface $form_state) {
    $form['celebrate_invitation'] = array(
      '#type' => 'checkbox',
      '#title' => $this->t('Show Invitation?'),
      '#default_value' => $this->settings['celebrate_invitation'],
      '#description' => $this->t('Display a short invitation after the default text.'),
    );
    return $form;
  }
For more details on using the Form API to define a form array, check out the Form API Documentation. If you have created for altered forms in Drupal 7, the convention should be familiar.
If we reload our text format admin page after adding this function, we’ll get an error:
Fatal error: Declaration of Drupal\celebrate\Plugin\Filter\FilterCelebrate::settingsForm() must be compatible with Drupal\filter\Plugin\FilterInterface::settingsForm(array $form, Drupal\Core\Form\FormStateInterface $form_state)
Essentially, it doesn’t know what a FormStateInterface, as designated in our settingsForm() method. We need to either add the full PSR-4 namespace to the method definition, or add another use statement. For our example, we’ll add another use statement to the top of our FilterCelebrate.php file.
use Drupal\Core\Form\FormStateInterface;
Now we can see our settings form in action.
To get access to these settings in our class, we can call $this->settings[‘celebrate_invitation’].
Our process method now looks like this:
  public function process($text, $langcode) {
    $invitation = $this->settings['celebrate_invitation'] ? ' Come on!' : '';
    $replace = '<span class="celebrate-filter">’ . $this->t(‘Good Times!' . $invitation) . ' </span>';
    $new_text = str_replace('[celebrate]', $replace, $text);
    return new FilterProcessResult($new_text);
  }
Now, if the “Show Invitation?” setting is checked, the text “Come on!” is added to the end of the replacement text.
Adding CSS to the Page When the Filter is Applied
But now we want to add a shaking CSS animation to the replacement text on hover, because we want to celebrate like it's 1999. The CSS should only be loaded when the filter is being used. This is where the additional properties of the FilterProcessResult object come into play.
First, we’ll create a CSS file in the root of our module folder called “celebrate.theme.css”. The following CSS is everything we need to enable a shaking effect on hover:
In order to attach our CSS file to the FilterProcessResult, it needs to be declared as a library. Create another file in the module root called “celebrate.libraries.yml” with the following text:
This defines a library called “celebrate-shake” that includes a CSS file. Multiple CSS and/or Javascript files can be included in a single library. For more details, see the documentation on defining a library.
Now that we have defined a library, we can add it to the page whenever our filter is being applied. We use the setAttachments() method of the FilterProcessResult object to add our library so our process function will look like this:
You will notice that we use the identifier “celebrate/celebrate-shake” to refer to our new library. The first half of the identifier is our module name and the second half is the library name itself. This is to help prevent name conflicts and collisions.
And as an added bonus, other modules will also be able to use our celebrate library.
Remember, since filters can be mixed and stacked on top of each other, a good filter will do one thing really well. Keep the use case compact and discreet. If you find your filter code getting long, having to write a lot of exceptions, work around assumptions, and adding more and more options to the settings form, it might be a good idea to step back and see if it makes sense to create more than one type of custom filter.
Drupal Developer having 9+ year experience, implementation and having strong knowledge of technical specifications, workflow development. Ability to perform effectively and efficiently in team and individually. Always enthusiastic and interseted to study new technologies
Đúng như thông báo trước đó, Apple vừa bán ra HĐH mới nhất của mình là OS X Mountain Lion qua Mac App Store với giá 20 USD. "Sư tử núi" được bổ sung hơn 200 tính năng mới, trong đó thay đổi lớn nhất có lẽ chính là khả năng tích hợp Mac với dịch vụ đám mây iCloud. Dưới đây là 8 tính năng đáng chú ý trong HĐH này.


")


 = x + x^2 + x^3 + … + x^n")


