
Khanh Hoang - Kenn
Kenn is a user experience designer and front end developer who enjoys creating beautiful and usable web and mobile experiences.
This chapter will cover the first steps when creating a Symfony2 website. We will download and configure the Symfony2 Standard Distribution, create the Blog bundle and put together the main HTML templates. At the end of this chapter you will have configured a Symfony2 website that will be available via a local domain, eg http://symblog.dev/. The website will contain the main HTML structure of the blog along with some dummy content.
The following areas will be demonstrated in this chapter:
As stated above we will be using the Symfony2 Standard Distribution. This distribution comes complete with the Symfony2 core libraries and the most common bundles required to create websites. You can Download the Symfony2 package from the Symfony2 website. As I don’t want to repeat the excellent documentation provided by the Symfony2 book, please refer to the Installing and Configuring Symfony2 chapter for detailed requirements. This will guide you through the process of which package to download, how to install the required vendors, and how to correctly permission folders.
Warning
It is important to pay special attention to the Setting up Permissions section in the Installation chapter. This explains the various ways you should permission the app/cache and app/logs folders so the web server user and command line user have write access to them.
For the purpose of this tutorial we will be using the local domain http://symblog.dev/, however you can choose any domain you want. These instructions are specific to Apache and assume you already have Apache setup and running on your machine. If you are comfortable with setting up local domains, or use a different web server such as nginx you can skip this section.
Note
These steps were performed on the Linux distribution Fedora so path names, etc, may differ depending on your Operating System.
Lets begin by creating a virtual host with Apache. Locate the Apache configuration file and append the following settings, making sure to change the DocumentRootand Directory paths accordingly. The location and name of the Apache configuration can vary a lot depending on your OS. In Fedora its located at/etc/httpd/conf/httpd.conf. You will need to edit this file with sudo privileges.
# /etc/httpd/conf/httpd.conf

NameVirtualHost 127.0.0.1

<VirtualHost 127.0.0.1>
  ServerName symblog.dev
  DocumentRoot "/var/www/html/symblog.dev/web"
  DirectoryIndex app.php
  <Directory "/var/www/html/symblog.dev/web">
    AllowOverride All
    Allow from All
  </Directory>
</VirtualHost>
Next add a new domain to the bottom of the host file located at /etc/hosts. Again, you will need to edit this file with sudo privileges.
# /etc/hosts
127.0.0.1     symblog.dev
Lastly don’t forget to restart the Apache service. This will reload the updated configuration settings we have made.
$ sudo service httpd restart
Tip
If you find yourself creating virtual domains all the time, you can simplify this process by using Dynamic virtual hosts.
You should now be able to visit http://symblog.dev/app_dev.php/.

If this is your first visit to the Symfony2 welcome page, take some time to view the demo pages. Each demo page provides code snippets that demonstrate how each page works behind the scenes.
Note
You will also notice a toolbar at the bottom of the welcome screen. This is the developer toolbar and provides you will invaluable information about the state of the application. Information including the page execution time, memory usage, database queries, authentication state and much more can be viewed from this toolbar. By default the toolbar is only visible when running in the dev environment, as providing the toolbar in production would be a big security risk as it exposes a lot of the internals of your application. References to the toolbar will be made through this tutorial as we introduce new features.
Symfony2 introduces a web interface to configure various aspects regarding the website such as database settings. We require a database for this project so lets begin using the configurator.
Visit http://symblog.dev/app_dev.php/ and click the Configure button. Enter the details to setup the database (this tutorial assumes the use of MySQL, but you can choose any other database you have access to), followed by generating a CSRF token on the next page. You will be presented with the parameter settings that Symfony2 has generated. Pay attention to the notice on the page, it is likely that your app/config/parameters.ini file is not writable so you will need to copy and paste the settings to the file located at app/config/parameters.ini (These settings can replace the existing settings in this file).
Bundles are the basic building block of any Symfony2 application, in fact the Symfony2 framework is itself a bundle. Bundles allow us to separate functionality to provide reusable units of code. They encapsulate the entire needs to support the bundles purpose including the controllers, the model, the templates, and the various resources such as images and CSS. We will create a bundle for our website in the namespace Blogger. If you are not familiar with namespaces in PHP you should spend some time reading up on them as they are heavily used in Symfony2, everything is namespaced. See the Symfony2 autoloader for specific details on how Symfony2 achieves autoloading.
Tip
A good understanding of namespaces can help eliminate common problems you may face when folder structures do not correctly map to namespace structures.
To encapsulate the functionality for the blog we will create a Blog bundle. This will house all the required files and so could easily be dropped into another Symfony2 application. Symfony2 provides a number of tasks to assist us when performing common operations. One such task is the bundle generator.
To start the bundle generator run the following command. You will be presented with a number of prompts that allow you to configure the way the bundle is setup. The default for each prompt should be used.
$ php app/console generate:bundle --namespace=Blogger/BlogBundle --format=yml
Upon completion of the generator Symfony2 will have constructed the basic bundle layout. A few important changes need to be noted here.
Tip
You don’t have to use the generator tasks that Symfony2 provides, they are simply there to assist you. You could have manually created the Bundle folder structure and files. While it is not mandatory to use the generators, they do provide some benefits such as they are quick to use and perform all tasks required to get the bundle up and running. One such example is registering the bundle.
Our new bundle BloggerBlogBundle has been registered in the Kernel located at app/AppKernel.php. Symfony2 requires us to register all bundles that the application needs to use. You will also notice that some bundles are only registered when in the dev or test environments. Loading these bundles in the prod(production) environment would introduce additional overhead for functionality that wouldn’t be used. The snippet below shows how the BloggerBlogBundle has been registered.
// app/AppKernel.php
class AppKernel extends Kernel
{
    public function registerBundles()
    {
        $bundles = array(
        // ..
            new Blogger\BlogBundle\BloggerBlogBundle(),
        );
        // ..

        return $bundles;
    }

    // ..
}
The bundle routing has been imported into the applications main routing file located at app/config/routing.yml.
# app/config/routing.yml
BloggerBlogBundle:
    resource: "@BloggerBlogBundle/Resources/config/routing.yml"
    prefix:   /
The prefix option allows us to mount the entire BloggerBlogBundle routing with a prefix. In our case we have opted to mount at the default which is /. If for example you would like all routes to be prefixed with /blogger change the prefix to prefix: /blogger.
Under the src directory the default bundle layout has been created. This starts at the top level with the Blogger folder which maps directly to the Bloggernamespace we have created our bundle in. Under this we have the BlogBundle folder which contains the actual bundle. The contents of this folder will be examined as we work through the tutorial. If your familiar with MVC frameworks, some of the folders will be self explanatory.
As part of the bundle generator, Symfony2 has created a default controller. We can run this controller by going tohttp://symblog.dev/app_dev.php/hello/symblog. You should see a simple greeting page. Try changing the symblog part of the URL to your name. We can examine at a high level how this page was generated.
The BloggerBlogBundle routing file located at src/Blogger/BlogBundle/Resources/config/routing.yml contains the following routing rule.
# src/Blogger/BlogBundle/Resources/config/routing.yml
BloggerBlogBundle_homepage:
    pattern:  /hello/{name}
    defaults: { _controller: BloggerBlogBundle:Default:index }
The routing is composed of a pattern and a some default options. The pattern is checked against the URL, and the default options specify the controller to execute if the route matches. In the pattern /hello/{name}, the {name} placeholder will match any value as no specific requirements have been set. The route also doesn’t specify any culture, format or HTTP methods. As no HTTP methods have been set, requests from GET, POST, PUT, etc will all be eligible for pattern matching.
If the route meets all the specified criteria it will be executed by the _controller option in defaults. The _controller option specifies the Logical Name of the controller which allows Symfony2 to map this to a specific file. The above example will cause the index action in the Default controller located atsrc/Blogger/BlogBundle/Controller/DefaultController.php to be executed.
The controller in this example is very simple. The DefaultController class extends the Controller class which provides some helpful methods such as the rendermethod used below. As our route defines a placeholder it is passed into the action as the argument $name. The action does nothing more than call the rendermethod specifying the index.html.twig template in the BloggerBlogBundle Default view folder to be rendered. The format of the template name isbundle:controller:template. In our example this is BloggerBlogBundle:Default:index.html.twig which maps to the index.html.twig template, in the Defaultviews folder of the BloggerBlogBundle, or physically to the file src/Blogger/BlogBundle/Resources/views/Default/index.html.twig. Different variations of the template format can be used to render templates at different locations within the application and its bundles. We will see this later in the chapter.
We also pass over the $name variable to the template via the array options.
<?php
// src/Blogger/BlogBundle/Controller/DefaultController.php

namespace Blogger\BlogBundle\Controller;

use Symfony\Bundle\FrameworkBundle\Controller\Controller;

class DefaultController extends Controller
{
    public function indexAction($name)
    {
        return $this->render('BloggerBlogBundle:Default:index.html.twig', array('name' => $name));
    }
}
As you can see the template is very simple. It prints out Hello followed by the name argument passed over from the controller.
{# src/Blogger/BlogBundle/Resources/views/Default/index.html.twig #}
Hello {{ name }}!
As we don’t need some of the default files created by the generator we can clean these up.
The controller file src/Blogger/BlogBundle/Controller/DefaultController.php can be deleted, along with the view folder and its content atsrc/Blogger/BlogBundle/Resources/views/Default/. Finally remove the route defined at src/Blogger/BlogBundle/Resources/config/routing.yml
We have 2 options by default when using Symfony2 for templating; Twig and PHP. You could of course use neither of these and opt for a different library. This is possible thanks to Symfony2 Dependency Injection Container. We will be using Twig as our templating engine for a number of reasons.
These are just some of the benefits of Twig. For more reasons why you should use Twig see the official Twig site.
As Twig supports template inheritance, we are going to use the Three level inheritance approach. This approach allows us to modify the view at 3 distinct levels within the application, giving us plenty of room for customisations.
Lets start by creating our basic block level template for symblog. We need 2 files here, the template and the CSS. As Symfony2 supports HTML5 we will also be using it.
<!-- app/Resources/views/base.html.twig -->
<!DOCTYPE html>
<html>
    <head>
        <meta http-equiv="Content-Type" content="text/html"; charset=utf-8" />
        <title>{% block title %}symblog{% endblock %} - symblog</title>
        <!--[if lt IE 9]>
            <script src="http://html5shim.googlecode.com/svn/trunk/html5.js"></script>
        <![endif]-->
        {% block stylesheets %}
            <link href='http://fonts.googleapis.com/css?family=Irish+Grover' rel='stylesheet' type='text/css'>
            <link href='http://fonts.googleapis.com/css?family=La+Belle+Aurore' rel='stylesheet' type='text/css'>
            <link href="{{ asset('css/screen.css') }}" type="text/css" rel="stylesheet" />
        {% endblock %}
        <link rel="shortcut icon" href="{{ asset('favicon.ico') }}" />
    </head>
    <body>

        <section id="wrapper">
            <header id="header">
                <div class="top">
                    {% block navigation %}
                        <nav>
                            <ul class="navigation">
                                <li><a href="#">Home</a></li>
                                <li><a href="#">About</a></li>
                                <li><a href="#">Contact</a></li>
                            </ul>
                        </nav>
                    {% endblock %}
                </div>

                <hgroup>
                    <h2>{% block blog_title %}<a href="#">symblog</a>{% endblock %}</h2>
                    <h3>{% block blog_tagline %}<a href="#">creating a blog in Symfony2</a>{% endblock %}</h3>
                </hgroup>
            </header>

            <section class="main-col">
                {% block body %}{% endblock %}
            </section>
            <aside class="sidebar">
                {% block sidebar %}{% endblock %}
            </aside>

            <div id="footer">
                {% block footer %}
                    Symfony2 blog tutorial - created by <a href="https://github.com/dsyph3r">dsyph3r</a>
                {% endblock %}
            </div>
        </section>

        {% block javascripts %}{% endblock %}
    </body>
</html>
Note
There are 3 external files pulled into the template, 1 JavaScript and 2 CSS. The JavaScript file fixes the lack of HTML5 support in IE browsers pre version 9. The 2 CSS files import fonts from Google Web font.
This template marks up the main structure of our blogging website. Most of the template consists of HTML, with the odd Twig directive. Its these Twig directives that we will examine now.
We will start by focusing on the document HEAD. Lets look at the title:
<title>{% block title %}symblog{% endblock %} - symblog</title>
The first thing you’ll notice is the alien {% tag. Its not HTML, and its definitely not PHP. This is one of the 3 Twig tags. This tag is the Twig Do something tag. It is used to execute statements such as control statements and for defining block elements. A full list of control structures can be found in the Twig Documentation. The Twig block we have defined in the title does 2 things; It sets the block identifier to title, and provides a default output between the block and endblock directives. By defining a block we can take advantage of Twig’s inheritance model. For example, on a page to display a blog post we would want the page title to reflect the title of the blog. We can achieve this by extending the template and overriding the title block.
{% extends '::base.html.twig' %}

{% block title %}The blog title goes here{% endblock %}
In the above example we have extended the applications base template that first defined the title block. You’ll notice the template format used with the extendsdirective is missing the Bundle and the Controller parts, remember the template format is bundle:controller:template. By excluding the Bundle and theController parts we are specifiying the use of the application level templates defined at app/Resources/views/.
Next we have defined another title block and put in some content, in this case the blog title. As the parent template already contains a title block, it is overridden by our new one. The title would now output as ‘The blog title goes here - symblog’. This functionality provided by Twig will be used extensively when creating templates.
In the stylesheets block we are introduced to the next Twig tag, the {{ tag, or the Say something tag.
<link href="{{ asset('css/screen.css') }}" type="text/css" rel="stylesheet" />
This tag is used to print the value of variable or expression. In the above example it prints out the return value of the asset function, which provides us with a portable way to link to the application assets, such as CSS, JavaScript, and images.
The {{ tag can also be combined with filters to manipulate the output before printing.
{{ blog.created|date("d-m-Y") }}
For a full list of filters check the Twig Documentation.
The last Twig tag, which we have not seen in the templates is the comment tag {#. Its usage is as follows:
{# The quick brown fox jumps over the lazy dog #}
No other concepts are introduced in this template. It provides the main layout ready for us to customise it as we need.
Next lets add some styles. Create a stylesheet at web/css/screen.css and add the following content. This will add styles for the main template.
html,body,div,span,applet,object,iframe,h1,h2,h3,h4,h5,h6,p,blockquote,pre,a,abbr,acronym,address,big,cite,code,del,dfn,em,img,ins,kbd,q,s,samp,small,strike,strong,sub,sup,tt,var,b,u,i,center,dl,dt,dd,ol,ul,li,fieldset,form,label,legend,table,caption,tbody,tfoot,thead,tr,th,td,article,aside,canvas,details,embed,figure,figcaption,footer,header,hgroup,menu,nav,output,ruby,section,summary,time,mark,audio,video{border:0;font-size:100%;font:inherit;vertical-align:baseline;margin:0;padding:0}article,aside,details,figcaption,figure,footer,header,hgroup,menu,nav,section{display:block}body{line-height:1}ol,ul{list-style:none}blockquote,q{quotes:none}blockquote:before,blockquote:after,q:before,q:after{content:none}table{border-collapse:collapse;border-spacing:0}

body { line-height: 1;font-family: Arial, Helvetica, sans-serif;font-size: 12px; width: 100%; height: 100%; color: #000; font-size: 14px; }
.clear { clear: both; }

#wrapper { margin: 10px auto; width: 1000px; }
#wrapper a { text-decoration: none; color: #F48A00; }
#wrapper span.highlight { color: #F48A00; }

#header { border-bottom: 1px solid #ccc; margin-bottom: 20px; }
#header .top { border-bottom: 1px solid #ccc; margin-bottom: 10px; }
#header ul.navigation { list-style: none; text-align: right; }
#header .navigation li { display: inline }
#header .navigation li a { display: inline-block; padding: 10px 15px; border-left: 1px solid #ccc; }
#header h2 { font-family: 'Irish Grover', cursive; font-size: 92px; text-align: center; line-height: 110px; }
#header h2 a { color: #000; }
#header h3 { text-align: center; font-family: 'La Belle Aurore', cursive; font-size: 24px; margin-bottom: 20px; font-weight: normal; }

.main-col { width: 700px; display: inline-block; float: left; border-right: 1px solid #ccc; padding: 20px; margin-bottom: 20px; }
.sidebar { width: 239px; padding: 10px; display: inline-block; }

.main-col a { color: #F48A00; }
.main-col h1,
.main-col h2
    { line-height: 1.2em; font-size: 32px; margin-bottom: 10px; font-weight: normal; color: #F48A00; }
.main-col p { line-height: 1.5em; margin-bottom: 20px; }

#footer { border-top: 1px solid #ccc; clear: both; text-align: center; padding: 10px; color: #aaa; }
We now move onto creating the layout for the Blog bundle. Create a file located at src/Blogger/BlogBundle/Resources/views/layout.html.twig and add the following content.
{# src/Blogger/BlogBundle/Resources/views/layout.html.twig #}
{% extends '::base.html.twig' %}

{% block sidebar %}
    Sidebar content
{% endblock %}
At a first glance this template may seem a little simple, but its simplicity is the key. Firstly it extends the applications base template that we created earlier. Secondly it overrides the parent sidebar block with some dummy content. As the sidebar will be present on all pages of our blog it makes sense to perform the customisation at this level. You may ask why don’t we just put the customisation in the application template as it will be present on all pages. This is simple, the application knows nothing about the Bundle and shouldn’t. The Bundle should self contain all its functionality and rendering the sidebar is part of this functionality. OK, so why don’t we just place the sidebar in each of the page templates? Again this is simple, we would have to duplicate the sidebar each time we added a page. Further this level 2 template gives us the flexibility in the future to add other customisations that all children templates will inherit. For example, we may want to change the footer copy on all pages, this would be a great place to do this.
Finally we are ready for the controller layout. These layouts will commonly be related to a controller action, i.e., the blog show action will have a blog show template.
Lets start by creating the controller for the homepage and its template. As this is the first page we are creating we need to create the controller. Create the controller at src/Blogger/BlogBundle/Controller/PageController.php and add the following:
<?php
// src/Blogger/BlogBundle/Controller/PageController.php

namespace Blogger\BlogBundle\Controller;

use Symfony\Bundle\FrameworkBundle\Controller\Controller;

class PageController extends Controller
{
    public function indexAction()
    {
        return $this->render('BloggerBlogBundle:Page:index.html.twig');
    }
}
Now create the template for this action. As you can see in the controller action we are going to render the Page index template. Create the template atsrc/Blogger/BlogBundle/Resources/views/Page/index.html.twig
{# src/Blogger/BlogBundle/Resources/views/Page/index.html.twig #}
{% extends 'BloggerBlogBundle::layout.html.twig' %}

{% block body %}
    Blog homepage
{% endblock %}
This introduces the final template format we can specify. In this example the template BloggerBlogBundle::layout.html.twig is extended where the Controllerpart of the template name is ommitted. By excluding the Controller part we are specifiying the use of the Bundle level template created atsrc/Blogger/BlogBundle/Resources/views/layout.html.twig.
Now lets add a route for our homepage. Update the Bundle routing config located at src/Blogger/BlogBundle/Resources/config/routing.yml.
# src/Blogger/BlogBundle/Resources/config/routing.yml
BloggerBlogBundle_homepage:
    pattern:  /
    defaults: { _controller: BloggerBlogBundle:Page:index }
    requirements:
        _method:  GET
Lastly we need to remove the default route for the Symfony2 welcome screen. Remove the _welcome route at the top of the dev routing file located atapp/config/routing_dev.yml.
We are now ready to view our blogger template. Point your browser to http://symblog.dev/app_dev.php/.

You should see the basic layout of the blog, with the main content and sidebar reflecting the blocks we have overridden in the relevant templates.
The final task in this part of the tutorial will be creating a static page for the about page. This will demonstrate how to link pages together, and further enforce the Three Level Inheritance approach we have adopted.
When creating a new page, one of the first tasks should be creating the route for it. Open up the BloggerBlogBundle routing file located atsrc/Blogger/BlogBundle/Resources/config/routing.yml and append the following routing rule.
# src/Blogger/BlogBundle/Resources/config/routing.yml
BloggerBlogBundle_about:
    pattern:  /about
    defaults: { _controller: BloggerBlogBundle:Page:about }
    requirements:
        _method:  GET
Next open the Page controller located at src/Blogger/BlogBundle/Controller/PageController.php and add the action to handle the about page.
// src/Blogger/BlogBundle/Controller/PageController.php
class PageController extends Controller
{
    //  ..

    public function aboutAction()
    {
        return $this->render('BloggerBlogBundle:Page:about.html.twig');
    }
}
For the view, create a new file located at src/Blogger/BlogBundle/Resources/views/Page/about.html.twig and copy in the following content.
{# src/Blogger/BlogBundle/Resources/views/Page/about.html.twig #}
{% extends 'BloggerBlogBundle::layout.html.twig' %}

{% block title %}About{% endblock%}

{% block body %}
    <header>
        <h1>About symblog</h1>
    </header>
    <article>
        <p>Donec imperdiet ante sed diam consequat et dictum erat faucibus. Aliquam sit
        amet vehicula leo. Morbi urna dui, tempor ac posuere et, rutrum at dui.
        Curabitur neque quam, ultricies ut imperdiet id, ornare varius arcu. Ut congue
        urna sit amet tellus malesuada nec elementum risus molestie. Donec gravida
        tellus sed tortor adipiscing fringilla. Donec nulla mauris, mollis egestas
        condimentum laoreet, lacinia vel lorem. Morbi vitae justo sit amet felis
        vehicula commodo a placerat lacus. Mauris at est elit, nec vehicula urna. Duis a
        lacus nisl. Vestibulum ante ipsum primis in faucibus orci luctus et ultrices
        posuere cubilia Curae.</p>
    </article>
{% endblock %}
The about page is nothing spectacular. Its only action is to render a template file with some dummy content. It does however bring us on to the next task.
We now have the about page ready to go. Have a look at http://symblog.dev/app_dev.php/about to see this. As it stands there is no way for a user of your blog to view the about page, short of typing in the full URL just like we did. As you’d expect Symfony2 provides both sides to the routing equation. It can match routes as we have seen, and can also generate URLs from these routes. You should always use the routing functions provided by Symfony2. Never in your application should you be tempted to put the following.
<a href="/contact">Contact</a>

<?php $this->redirect("/contact"); ?>
You may be wondering what’s wrong with this approach, it may be the way you always link your pages together. However, there are a number of problems with this approach.
The correct way to link pages together is with the path and url methods provided by Twig. They are both very similar, except the url method will provide us with absolute URLs. Lets update the main application template located at app/Resources/views/base.html.twig to link to the about page and homepage together.
<!-- app/Resources/views/base.html.twig -->
{% block navigation %}
    <nav>
        <ul class="navigation">
            <li><a href="{{ path('BloggerBlogBundle_homepage') }}">Home</a></li>
            <li><a href="{{ path('BloggerBlogBundle_about') }}">About</a></li>
            <li><a href="#">Contact</a></li>
        </ul>
    </nav>
{% endblock %}
Now refresh your browser to see the Home and About page links working as expected. If you view the source for the pages you will notice the link has been prefixed with /app_dev.php/. This is the front controller I was explaining above, and as you can see the use of path has maintained it.
Finally lets update the logo links to redirect you back to the homepage. Update the template located at app/Resources/views/base.html.twig.
<!-- app/Resources/views/base.html.twig -->
<hgroup>
    <h2>{% block blog_title %}<a href="{{ path('BloggerBlogBundle_homepage') }}">symblog</a>{% endblock %}</h2>
    <h3>{% block blog_tagline %}<a href="{{ path('BloggerBlogBundle_homepage') }}">creating a blog in Symfony2</a>{% endblock %}</h3>
</hgroup>
We have covered the basic areas with regards to a Symfony2 application including getting the application configured and up and running. We have started to explore the fundamental concepts behind a Symfony2 application, including Routing and the Twig templating engine.
Next we will look at creating the Contact page. This page is slightly more involved than the About page as it allows users to interact with a web form to send us enquiries. The next chapter will introduce concpets including Validators and Forms.

Kenn is a user experience designer and front end developer who enjoys creating beautiful and usable web and mobile experiences.
![]()


The original 9/11 Memorial.org site was a loosely connected assortment of independent applications including a storefront, blog, and donation pages.
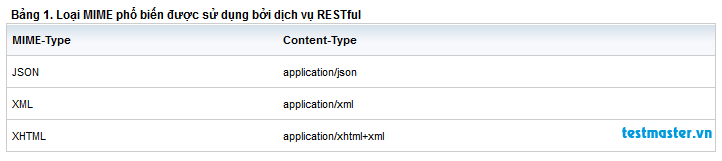
REST (Representational State Transfer) đã được chọn sử dụng rộng rãi thay cho Web service dựa trên SOAP và WSDL
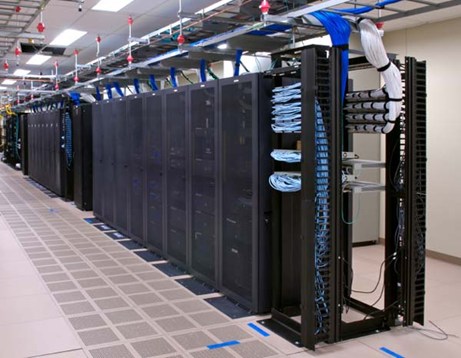
Hosting là không gian lưu trữ mã nguồn để chạy website, nếu Domain (Tên miền) là địa chỉ nhà của bạn, thì Hosting là khu đất để xây nhà.


")


Bình luận (0)
Add Comment